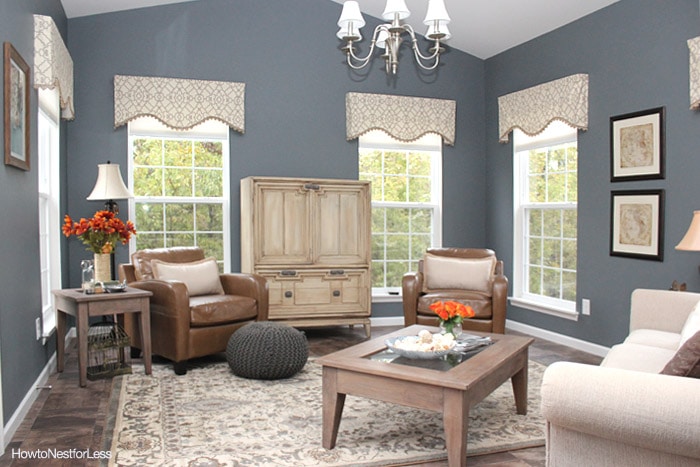
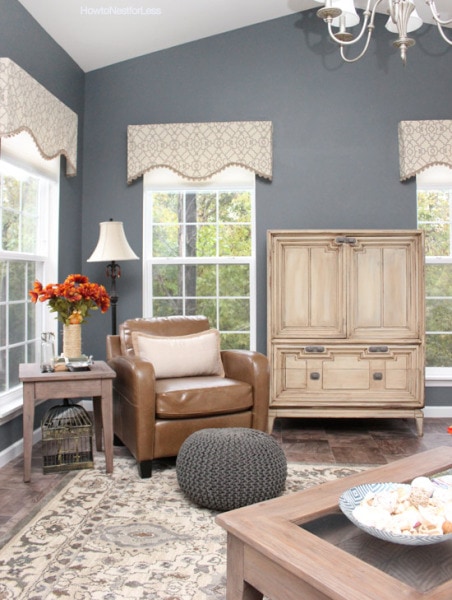
A couple weeks ago I showed you how we created the DIY window cornices in our kitchen. Well I wanted to do a little something different for our hearth room so instead we decided to create professional-looking Board Mounted Valances… and here’s how.
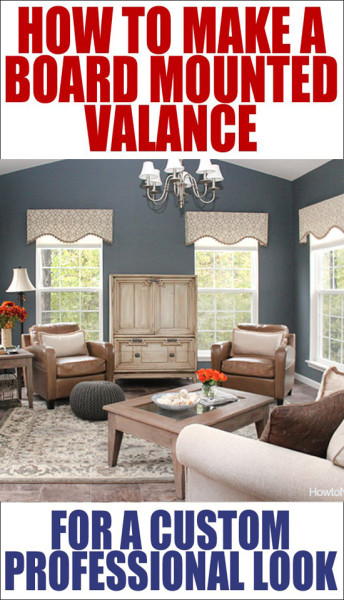
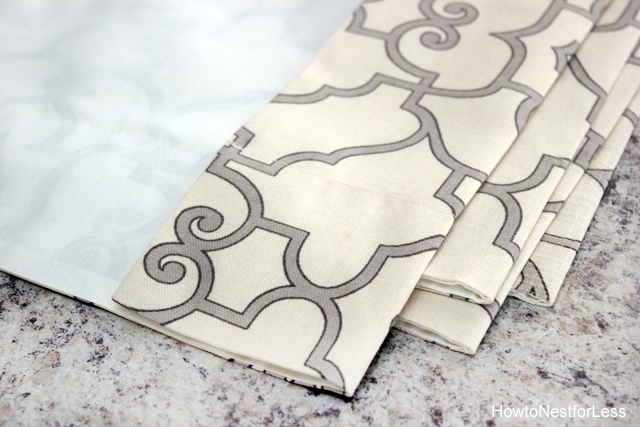
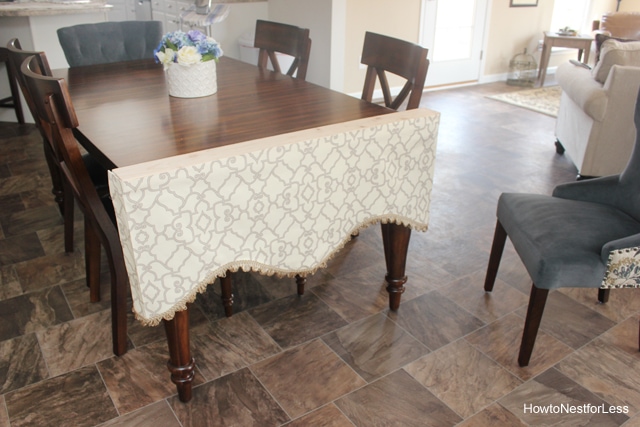
I purchased some 51 inch wide valances online that was a great fabric and pattern, plus had a fun detailed trim and scalloped edge. Since I wanted the valances to look professionally installed I opted for the Board Mounted Valance installation with some simple 2×4 boards I had in my basement from a previous project.
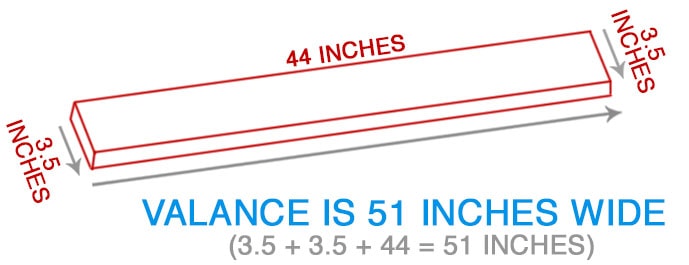 Now for the measuring fun… Each 2×4 board is NOT 2×4″ on the sides. It’s actually more like 1.5 x 3.5 inches. So if you add the two side widths, that was 7 inches total off my valance fabric length, leaving me with 44 inches for the broad side of the board for the remainder of the fabric valance that is 51 inches wide.
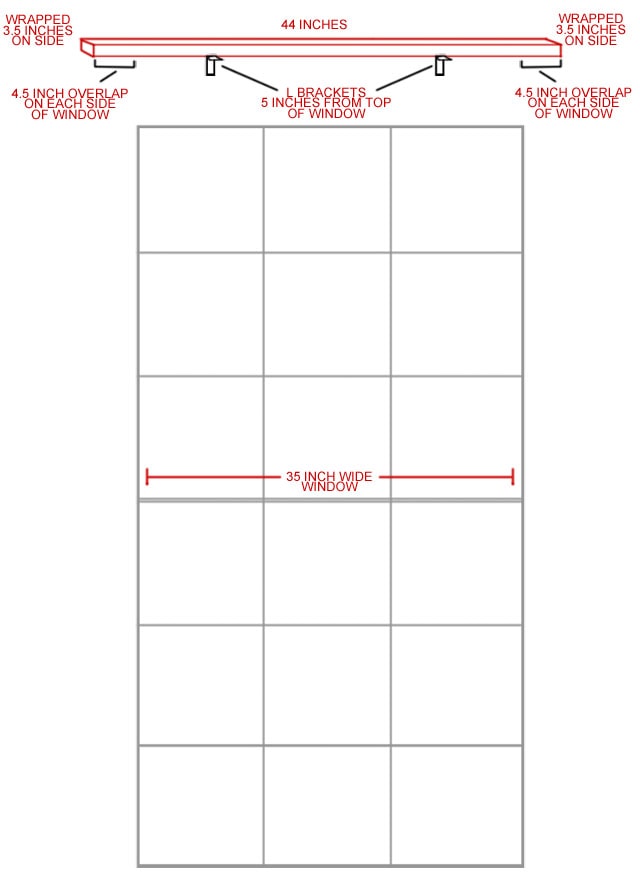 Since my window was 35 inches wide that left me with 4.5 inches overlap for each side of the valance. PERFECT in my book.
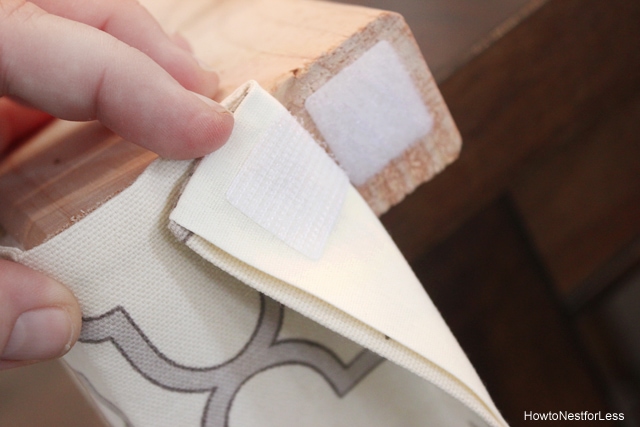
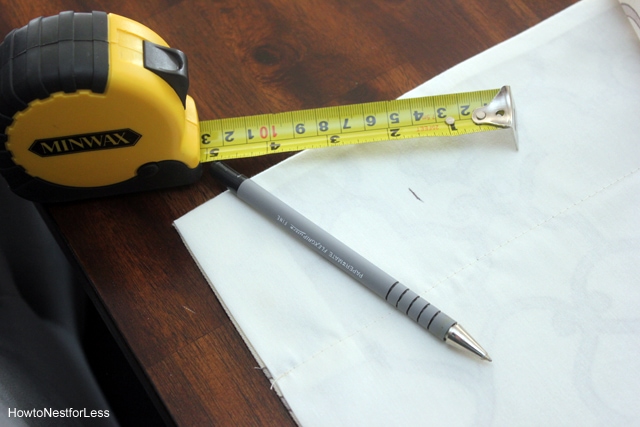 So now it’s time to mark the fabric valances where I need to iron a crease. As noted the side of each board is 3.5 inches so I measured and marked that on the back of each valance on the left and right sides. Once everything was marked I ironed a sharp crease in all 5 valances for the hearth room.
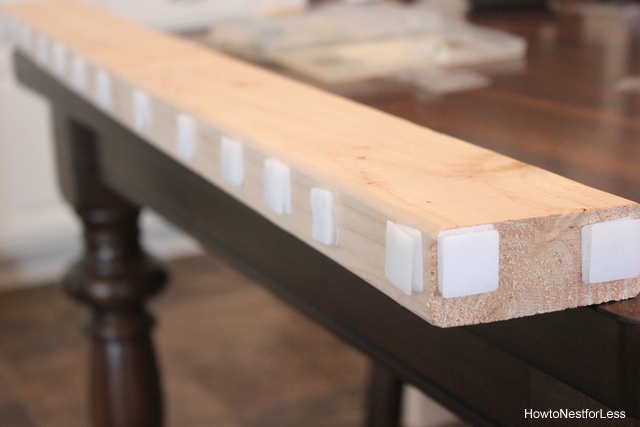
 Now back to the boards. I lined it with velcro. Yep, velcro. I figured this was an easy way to change out the valance fabric if I ever change my mind, or take down to wash or dust.
 Then I pressed the fabric valance all the way around the velcro-lined boards.
 And if you measure right, everything should line up perfectly!
Including that crease that you ironed into the fabric right at the corner of your board.
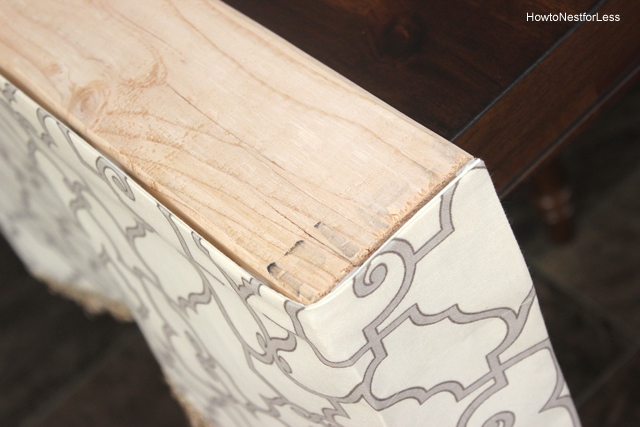 After each one was complete, I laid it on the end of my kitchen table to make sure the fabric was perfect before hanging.
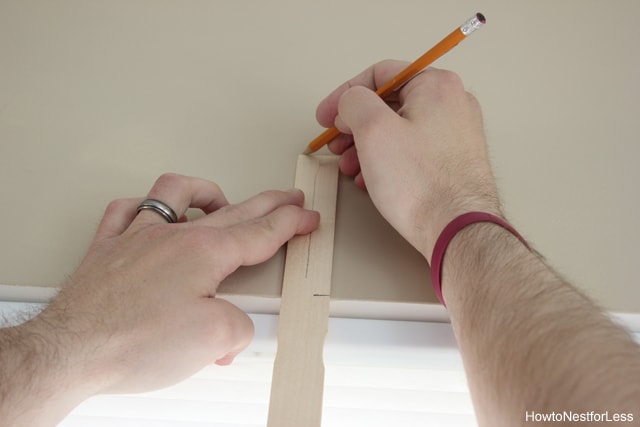
 Now it’s time to measure for the installation of the L brackets. The easiest way was to measure 5 inches and mark it on a paint stick. Line up the marked edge with the top of the window, then draw a line just above the paint stick. Mark TWO SPOTS above every window for the L brackets.
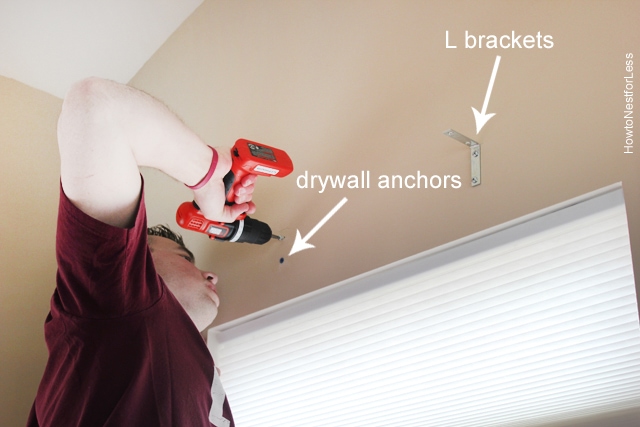
 The top flat part of the L bracket sat at the marked line on the wall. And since we didn’t have studs in those areas, we used drywall anchors to secure to the walls.
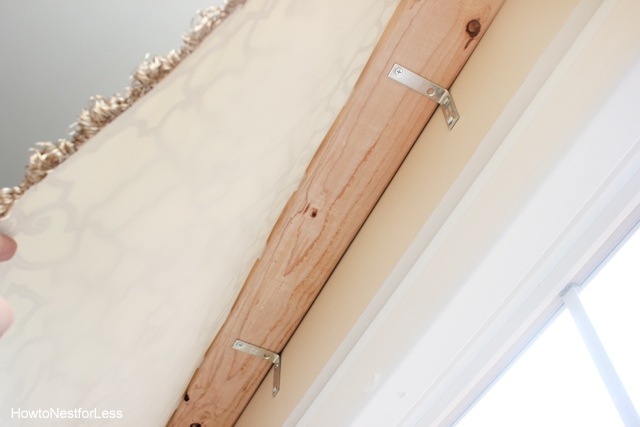
 Then it was time to place the board valance on top of the L brackets and screw into place. Make sure it’s centered above the window before you start screwing!
 And that’s it! From start to finish these 5 windows (yes, FIVE!) took us less than 3 hours, and that included cutting the boards, ironing and all of the measuring, etc.
 I actually came across this idea when walking through a model display home of a local home builder. I loved their window treatments, examined how they were made, and was simply amazed at the ease of the project.
 And trust me, it might be a little harder than it actually is. Don’t be fooled by my long-winded tutorial. Just a couple 2x4s and L brackets. That’s it! And you’ll have professional looking window treatments in just one afternoon!


Kim Weir says
Very pretty! I like the detail on the bottom!! Thinking of doing this to my dining room but actually making the valance myself. I have a hard time finding curtains I like not to mention the prices are outrageous! I just bought curtains for my living room and couldn’t find sheers I liked so I bought a stamp and some paint that matched my new curtains. Stamped away yesterday! Love the way they came out!
howtonestforless says
Oh, how I wish I could sew! Would save me TONS of money!!
Mariella says
Thanks for sharing that!!! The perfect solution and timing for what i looking for !
Xx,
Mariella
howtonestforless says
Wonderful to hear, Mariella!
Designs By Katy says
SO cute! I love the fabric choice.
http://www.designsbykaty.com
howtonestforless says
Thank you so much Katy!
Linda says
Love the cornice and material. Will you share the website where you purchased the curtains.
howtonestforless says
Thanks Linda! I purchased them from Wayfair here. The RLF brand has tons of beautiful designs!
Linda says
What type of Velcro did you use? The stick on packages that I looked at said not for use on fabric.
howtonestforless says
The Velcro brand actually makes some specifically to be used with fabric. Some are heat activated and some are just industrial strength bonding (which is what I used). Hope that helps! I purchased it from Lowe’s 😉
Michela Grascia says
can you tell me where you find the valances? I love the color! thanks for the tips…..
howtonestforless says
They’re from Wayfair!
http://www.wayfair.com/RLF-Home-Garden-Gate-50-Curtain-Valance-11359XX-QEF1012.html
Michela Grascia says
Hello,
thanks for the tips but I don’t understand this part:
” So now it’s time to mark the fabric valances where I need to iron a crease. As noted the side of each board is 3.5 inches so I measured and marked that on the back of each valance on the left and right sides. Once everything was marked I ironed a sharp crease in all 5 valances for the hearth room.”
Do you fold the valance on the back?
thank you
howtonestforless says
No, it was to wrap the fabric around the sides of the wood. The boards are 44 inches wide by 3.5 inches deep. I needed that side fabric to hide the depth of the wood. Hope that helps!
Jennifer says
I saw this on Pinterest. My windows are so much like yours and my hubby is willing to help with this project! He is happy they can be removed and washed-less dust to aggravate allergies.Thank you for the tutorial.
howtonestforless says
You’re welcome!
Kristen says
Love the valances! I’m curious what brand your ‘fireplace’ is and where you purchased it – we’ve been looking for one just like it 🙂 Thank you!
howtonestforless says
We purchased it from Lowe’s. I do not see it on their website right now, but probably because it’s out of season. I think it was Boston Loft brand? Sorry I couldn’t be of more help!
Alisha Loya says
I think your valances are gorgeous and will use your instructions for my installation. My first question is, I noticed the top of the 2×4 (the portion face ceiling) is bare having no fabric and the wood is exposed. Is this how you designed it and why? Is it noticeable? 2 question, love the fabric which online store do you purchase from? Thank you again and fabulous work.
howtonestforless says
No need to cover with fabric because no one can see that high (even my 6’4 husband!). And you can purchase the curtain panels from here:
http://www.wayfair.com/RLF-Home-Garden-Gate-Shaped-Cotton-Curtain-Valance-11359XX-L6261-K~QEF1012.html?refid=GX42755235300-QEF1012_7484404&device=c&ptid=59978400420&PiID%5B%5D=7484404&gclid=COrGytf-970CFZRr7AodBUAAgQ&SSAID=389818&refid=SS389818
Malinda Walker says
I loved the way the valances came out. I am going to make them for my living room and dining room.
howtonestforless says
Thanks! Good luck with yours!
Laurie says
I found slightly different RLF valances for $30 less expensive than Wayfair.com right on RLFhome.com website w/$10 shipping for all 6 valances and I was able to get (5) 50″ valances and (1) 100″ valance to use for my big window instead of piecing them together like I had planned.
I am going to use your trick for board mount. Thank you!
howtonestforless says
Awesome tip! Good to know it’s cheaper from their own website.
Yonatan says
You did not explain how to attach Velcro to the wood (and material).
howtonestforless says
The back side of the Velcro is sticky!
Yonatan says
Thank you. I did not know that! I will look for Velcro in my country otherwise will buy online. Thanks so much.
Best regards, Yonatan
Yonatan says
I need to ask regarding the Velcro. I will have to buy online and would like to ask if you used 1 inch and therefore cut 1 inch squares?
Also, I see there is “extreme” and there is “low profile” – what do you recommend?
I signed up for your emails and appreciate your input.
Thanks again and regards,
Yonatan
laurie says
This valance is meant to be hung with a curtain rod. I don’t see the puckering or seams for the pocket in your pictures of this valance. Did you trim and hem the top or is it really not noticeable?
howtonestforless says
It’s really not noticeable!
Cynthia Syverson says
Just curious about the top. Is it left raw wood? The ones I photographed at Calico Corners were wrapped with liner.
howtonestforless says
Yes, just raw wood!
Cleo says
Very nice. I’ve been looking for something to use as a valance over a Roman shade I made for the master ensuite. I’m curious though….if your window was 35″ wide why did you make it 44″ wide? That’s an overhang of 4.5″ on each side.
howtonestforless says
I had planned on eventually casing out the windows with moldings! Needed to leave myself a little breathing room.
Mary McCarthy says
Question. I just did this to one of my valances I had. The valance was already lined but I am getting a lot of light showing through the fabric except where the board is. Do you have this problem. It doesn’t look like it from the pictures.
carmen says
No, we didn’t. I’m sorry!
Amy says
Excellent tutorial! How long did you make your fabric valence? And how high above the window did you hang the boards?
Linda M brooks says
Can you use the board mounted idea for curtains that will be hung to the ceiling?