Make sure you follow me on Instagram and Pinterest for a sneak peek into my recent projects!
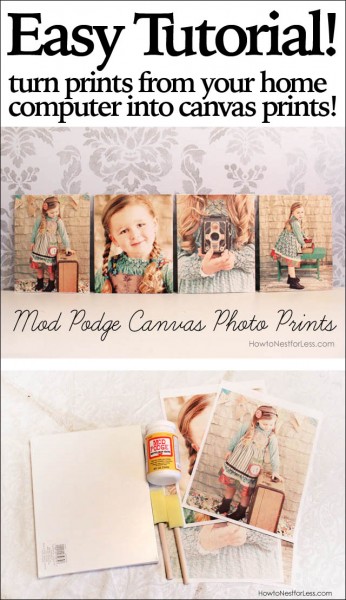
I had a bunch of new projects with my recent Laundry Room makeover and thought I would share an easy one with you today that’s cheap and quick to make… Mod Podge Canvas Photo Prints.
 I gathered my supplies:
- Photos printed on laser paper
- Mod Podge
- 8×10 inch canvas boards
- Paint brushes or foam brushes
- Scissors or exacto knife
 Print your photos on normal printer laser paper, but do not trim out. Coat your 8×10 inch canvas boards in Mod Podge and center the printable on the board.
 With the little bit of overlap, trim the corners back so you can fold around the back of the board. This way you’ll have clean edges when the project is complete.
 Put an extra coat of Mod Podge across the front of the canvas for a protective top coat.
 And that’s it! You have some great personal canvas prints of your favorite photos! You can also frame in a 8×10 inch frame if preferred or hang as is (I used double sided tape in my laundry room).

 The paper will actually glue down pretty tight to the canvas. You’ll see a bit of the texture come through which gives it the impression that it was printed on canvas. Yep, but you’re getting the look for less!


katie says
Love how simple this project is! Your daughter is adorable!!!
howtonestforless says
Thanks Katie!
Dana says
Gorgeous… and I LOVE those pictures of your daughter!
howtonestforless says
Aww, thanks Dana!
SJ@Sweeter Still says
What an easy way to display photos without a lot of work or cost! Thanks for some great inspiration!
howtonestforless says
You’re welcome!
Capturing Joy with Kristen Duke Photography says
LOVE those images in your laundry room!!!
Ellora @ Creatively Southern says
Love this project! And what a beautiful girl!!! I’m going to have to try this with some of our little girl’s pics too. Thanks for the inspiration!!!
howtonestforless says
You’re welcome Ellora! Good luck with yours 🙂
Stefany says
Love the look on canvas! Great way to display those cute pics, and I really like the idea of putting them in the laundry room. Keep the great ideas coming!
howtonestforless says
Thanks Stefany!
Mariella says
Hi Erin,
I love the work you did in the laundry room. And again, thank you for sharing,… I have a question…how to hang the canvas in the wall? I want to do something similar at my kids playroom… Also those canvas are something i can get at walmart? Or i am limited to michaels? Thank you soooooo much!
-mariella
howtonestforless says
Hi Mariella! I actually used double sided tape to stick these canvas prints up on the wall. Works really well… maybe a little too well cause I might have some trouble tearing them down someday 🙂 WalMart does have some canvases in stock, but I don’t know if they are the thin ones like I used (which I prefer since they’re easier to wrap the paper around). Hope that helps!
Handmade by Hilani (@HandmadebyHilan) says
Shut the Front Door! Hellow Awesome!
howtonestforless says
Thanks girlie!
Ann Marie @ white house black shutters says
I’m blown away, Erin! So simple yet so awesome. The rest of the laundry room looks amazing too! 🙂
howtonestforless says
Thanks Ann Marie!
Joy says
I just found this on Pinterest. I just did some with wallpaper samples and hung them over my bed. tip: i bought my canvases at the Dollar store..2 in a pack for 1.25 🙂 your daughter is verry prety and i woukld loove a “nice” laundry room 😉
howtonestforless says
Wow, I didn’t know you could get the canvases from the Dollar Store. I’m headed there during my lunch!! THanks for the tip and sweet words 🙂
Julie says
I have done this before. Iove the photos of your daughter!
howtonestforless says
Thanks Julie!
Jennifer says
Beautiful; both the photography and canvas project!!!
howtonestforless says
THanks Jennifer! My photographer Kristine Lynn was amazing 🙂
Kathie says
Thanks for this – such a great, simple idea. I even have some Mod Podge in the closet! Glad I found your link on the Live Laugh Rowe party. 🙂
howtonestforless says
Thanks for visiting Kathie! Good luck with your prints 🙂
Bonny says
These are so pretty, and I love the photographs you chose. Thanks for the tutorial. I plan to make some, but I just need to decide where I can put them.
howtonestforless says
THanks Bonny! Good luck with yours 🙂 Super easy craft I promise!
Trish - Mom On Timeout says
Your photographs are just beautiful! Thanks so much for sharing!
Desiree says
Love the tutorial. I featured it today on my blog… Thank you for sharing!
howtonestforless says
Thanks so much Desiree!
Holly says
I am so totally doing this! So cute and fun!
Paula@SweetPea says
Great tutorial! I can think of so many ways to use this idea.
I’m visiting from Serenity Now.
Jen says
I love this idea and cant wait to try it! Wrapped canvases are so expensive and these look just like them!
howtonestforless says
Thanks Jen! I was actually surprised how well they turned out. Now I just have to find a 16 x 20 inch printer 😉
diane says
You can do the prints at certain printing shops and they do the contractor sizes. It isn’t expensive at all.
alison says
Where can I buy the canvas background? Is Michaels or Joanna crafts good places? I really love this idea and want to do this with photos of the sunrise and sell them
howtonestforless says
Yep, Michael’s or JoAnns. I actually saw these canvases today at WalMart, too!
alison says
Thank you! I was checking into Pearl’s crafts and they have them for really good prices. I am so thrilled to get started. Just going to start with a small one and see what happens. Do you recommend printing on standard paper or glossy photos?
howtonestforless says
Standard paper worked best for me!
[email protected] says
I’ll be featuring YOU tomorrow morning at 7 am central time. Thank you so much for linking up to {wow me} wednesday at GingerSnapCrafts.com
Ginger
ps What is the name of the font you used in your pictures?? I love that one! 😉
howtonestforless says
THANK YOU Ginger!! You made my morning 🙂 The font I used is Learning Curve. One of my favorites 🙂
Carrie says
The photos are darling.
Alison says
I tried this using a photo printed on photo paper and instead of wrapping it around, I painted the sides with black acrylic paint and it came out so nice! I have seen some tutorials on how to transfer the photo to canvas using mod podge but I have tried a few times and it kept removing parts of the actual photo, so I decided it is not for me. Your idea is much much better. I also like the idea of wrapping the photo all the way around so I will be trying that later with regular copy paper. Since I don’t have a big printer, I get my prints done at Staples. They are very inexpensive; you can get an 18×24 color print on paper for around $2.00. Just a thought if you wish to go bigger than 8×10. Walmart does have some great canvases that are inexpensive and I like how they have flatter ones instead of the ones that are raised. Thanks again for an awesome tutorial! Have you tried to use the packing tape transfer? That is pretty great also, but I don’t think it comes out as nicely as your tutorial does.
howtonestforless says
Wow, thanks Alison for the wonderful info! I don’t have a Staples near me, but I’ll have to try Walmart (as I’d really like to do some bigger canvas prints). I haven’t tried the packing tape transfer either. I’m a little afraid of a craft fail with that one 🙂 Thanks again for your tips!!
Bridgett says
I am having issues with my ink from my picture running. I know it’s dry because I printed it 2 weeks ago. Did you have that problem?
howtonestforless says
No, I didn’t have that problem. I used a foam brush and applied a pretty thick coat so it wouldn’t pull the ink from the paper. If your coats are too thin, you might be dragging the ink with the brush since it’s too sticky. Hope that helps!
Melanie says
Can you Mod Podge an actual photo or should it be a color print on paper?
howtonestforless says
I found that printing it on paper is so much easier! A real photo can be too thick 😉
Kris says
I had problems with my paper wrinkling, was I too impatient? That wouldn’t surprise me because I was SO anxious to get this done and see how it turned out. This was, by far, the easiest tutorial, and like everyone else has said, your daughter is adorable. Thanks for any insights!
-Kris
howtonestforless says
Thanks so much! I had a couple wrinkles but just smoothed them out with my finger. A little sticky but it worked, haha!
Kris says
Mine are pretty big, more like creases. Should I wait for the mod podge on the canvas to dry with the photo, then put the next layer on top? Thanks again.
howtonestforless says
I went ahead and mod podged it right away. I smoothed it out with my fingers as I went though. But no matter what you will probably have a couple small creases. I do!
Kris says
Perhaps it’s just me. Maybe I’m using too much podge? Who knows. I’ll keep trying! I just did another and got the same wet-paper wrinkle/creases, but it surely must be something I’m doing that’s not quite right. Thanks for the advice!
Melanie says
What type of mod podge should I use for this project? I was just at Hobby Lobby and there was such a huge selection. I am new to crafting! lol I found this idea on Pintrest and am so excited to make Christmas gifts this year. Thanks for the help and insight.
howtonestforless says
Haha! I’ve used both matte and gloss for this. Either one works great! Good luck to you and happy crafting!!
Kris says
I had the exact same problem today. I stared at the Podge section for at least 10 minutes before the women scoffing at me became unbearable. I picked up the Matte and Like I said in my post above, aside from what ever it is that I’m doing wrong to get these large wrinkles/creases, the photos look great. Good luck!
Katherine says
How do you keep the paper from bubbling when using the mod podge?
Katherine says
Never mind… Just read above comments and found some tips online. 🙂
nevin says
Hi, I am new at canvas painting and mod podge. How do you clean your sponge from the mod podge when you are done with your project? Great tutorial, thanks a lot. I am going to try it now.
howtonestforless says
I actually just throw away the little sponge brushes when I’m done. They’re pretty cheap… I think you can even get a package of them from the dollar store!
nevin says
Another question 🙂 I printed two pictures from my computer on a regular paper. They are not very clear. If I apply them on the canvas, is it going to turn out good? Do I need to have a professional camera?
howtonestforless says
You’ll need to start out with a high resolution (or clean & clear) image. You won’t need a professional camera; just a nice shot with your regular point and shoot camera should be fine!
kkempen says
Lovely idea but really struggled with the ink pulling off when I mod poged them. Thinking of giving up. Tried sponges and brush to apply thick coat. ALSO HAD MAJOR WRINKLING ISSUES.
Jenny says
Do you have to have a laser printer or just laser paper. I only have an inkjet printer that works at the moment
howtonestforless says
Just normal inkjet printer works perfectly!
Jenny says
I am trying to do this for Christmas gifts but am really confused about the pictures. I only have an ink jet printer. Do I go and have prints made by a laser printer or can I just use my printer with regular paper?
howtonestforless says
No, ink jet works perfectly!!
howtonestforless says
And normal cheap paper is fine too 😉
Paige says
I just did this as a Christmas present, and it came out beyond perfect! I printed my photo at one of those Kodak kiosk, and worried because it said my resolution was too low… But I tried the project anyway and am so satisfied. Thanks!!!
howtonestforless says
AWESOME PAIGE!!
Patti says
Awesome idea!! Have you noticed any bowing/bending with your thin canvases? I have done this sort of technique with words printed onto thin scrapbook paper (my take on subway art) and after the mod podge has dried my canvases are curved. I was wondering if this ever happened to anyone else??
howtonestforless says
No, didn’t happen to me. They’re still hung in my laundry room and look fine. Hope you can get yours fixed!
Shellie says
So cool! Can I make the prints using my inkjet but on laser paper or do I need a laser printer too?
howtonestforless says
Inkjet is perfect!
debbiefrank says
i like to know when you put your picture on the canvas do you put the picture facing down or facing up? do you have to do any rubbing off to get the paper off or do you just put the picture facing up and rub the mod podge on the picture and canvas. I love your photo’s
howtonestforless says
Picture face up. You keep the paper on as well… you’re not transferring the ink. You’re just mod podging the paper onto the canvas. Hope that helps!
Suzie Harrison says
I just tried to Mod Podge scrapbook paper onto canvas. It was a complete and total FAIL! Fail times five actually. I tried using a light amount of Mod Podge, a heavier amount, and different weights of paper. I had multiple problems. The Mod Podge was rippling up and not sticking to the canvas in several cases. Best case scenario, I finally got one that still had major wrinkles and creases in the paper. I am just so incredibly frustrated! PLEASE HELP!!
howtonestforless says
Oh no Suzie, that stinks! One thing I remember was having to work quickly!! Yes, I had some creases in the paper, but I smoothed them out with my finger as I used my foam brush. Also, once the Mod Podge was down, I did not apply additional layers. Let the Mod Podge soak into the canvas and paper. Otherwise it will just cause the paper to almost disintegrate! Hope that helps and good luck!!
Pat says
Well, you are simply awesome and an absolute darling to share this darling project. My grandchildren (ages 11 and 12) can do this! Thanks for sharing.
howtonestforless says
You’re welcome!
Simmer Dougherty says
I reposted some of your great ideas. Your blog is wonderful.
Simmer Dougherty
Peacocksandpapertrees.com
howtonestforless says
Thank you so much!
Amy says
Beautiful photos and canvas! I do it a little differently but one thing I have found to solve the wrinkles and bubbles is if you print on a printer at home, get the highest quality photo paper you can find. I had the regular Kodak stuff and it bubbled and puckered right away and never laid flat, it was super frustrating. Then I remembered the last time that I did it I had different paper so I got some of that again and it worked like a charm, no bubbles or puckering, it laid nice a flat and stayed that way through all the mod podging.
howtonestforless says
Thanks for the tip, Amy!
diane says
Question since I don’t have lazer if I did a photo and went to a copy shop and had them do it on lazer print if they have it would that work.
howtonestforless says
Yes, it should work!
Kimberly says
Hi there! I LOVE this project and plan on doing it soon. I tried your link to the photography place and it didn’t work. I live in the St. Louis area and was interested in using her. If I can’t get a link that works maybe a phone number would be helpful? Thanks so much for your time and keep the ideas coming!
howtonestforless says
This is her Facebook page but I see she hasn’t posted recently. Hope she’s still photographing! She was amazing!!
https://www.facebook.com/Kristine-Lynn-Photography-190656629808/
Nilda says
Hello from Howard Beach
I love that you put step by step and it helped me a lot! I got this craft from a good friend of mine in Navarre, Fla she’s very crafty and I’m very lucky to have met her. Your pictures are beautiful.
Thank you kindly for your service
Nilda
Faith14 says
Hi! I was wondering if u flipped the picture before putting it on the canvas. I flipped it but tried it your way and I’m waiting for it to dry
howtonestforless says
No, I did not flip it. I put the mod podge directly on top of the print.
Bridget says
Does the picture need to be printed with a laser printer?
howtonestforless says
No, inkjet is perfect!
Kathy says
I tried this today and mine turned out wrinkly. I had my paper upside down on the table and set the wet canvas on top of it. Should I have done it the other way? I also want to make sure that basic copy paper is ok. I wasn’t sure if laser paper is different.
howtonestforless says
Yes, regular paper is just fine! I would put the paper on top of the canvas. Hope it works for your second try!