I’m in the process of giving my Laundry Room a makeover and I’d really REALLY love to get a new front load washer & dryer to jazz up the space, but… well, I’m broke.
 So instead of stenciling my Laundry Room wall as initially intended, I decided to give my 7 year old washer & dryer a bit of a facelift and breathe some new life into these old friends of mine.
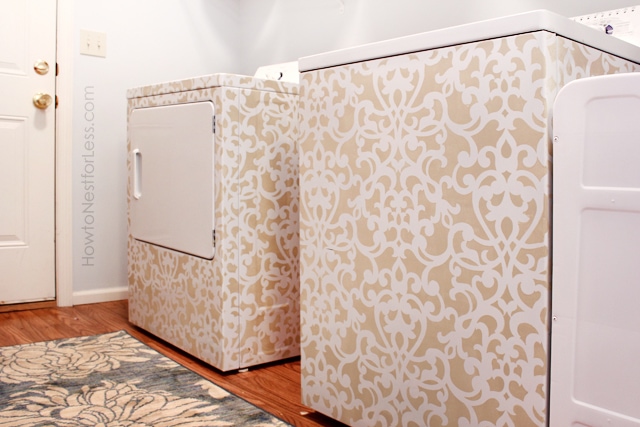
 After hours of grazing through all the fabulous stencil options from Royal Design Studio, I finally decided the Donatella Damask. Swoon!
 I centered the thick plastic stencil on the front of my dryer and stuck it in place with some painter’s tape. Now it’s time to start painting!
 I used a little cabinet and trim roller to apply my paint. I actually chose to use Annie Sloan Chalk Paint in Country Grey since I knew it would be a fabulous color contrast against the white metal.
 The first panel was up and I was extremely happy with the result so time to move onto the next section. The pattern repeats so I just had to line up the edges, tape up again, and continue painting my pattern.
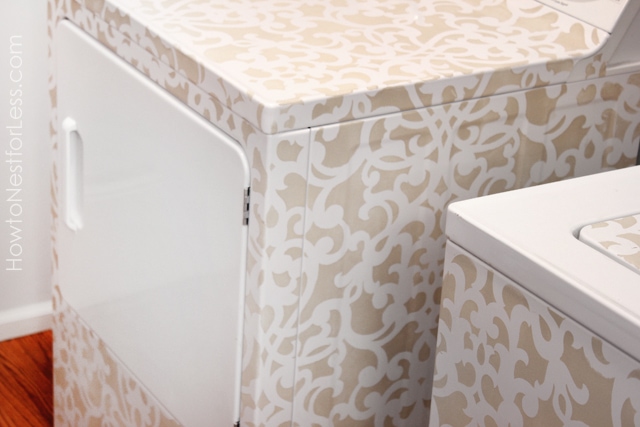
 Once I was finished painting the entire washer and dryer, I sealed the Chalk Paint to the surface with some polyurethane so it doesn’t scratch off the slick metal surface.
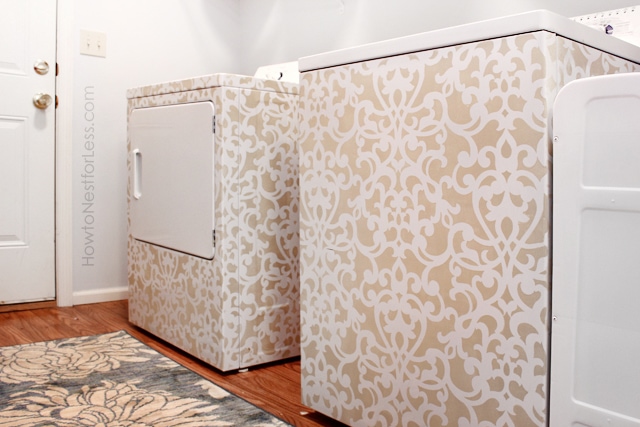
And I couldn’t be happier with the final result!


 See the entire Laundry Room Reveal here.

Lori Young says
Erin it looks great!! Fun way to spruce up your old appliances!!~ Lori
howtonestforless says
Thanks Lori!
Leigh-Ann says
Your washer and dryer look fabulous! Don’t waste you money on those high end front loaders. Worst purchase I ever made. I threw mine out and now have the good “old fashioned” kind and couldn’t be happier. Although, painting mine might make me happier…
howtonestforless says
Haha, thanks for the advice Leigh-Ann. I’ve been hearing a lot of bad things about the front loaders recently. Luckily mine are still working great!
Megan Brooke says
What a cute idea!! Now your washer and dryer look brand spanking new 🙂
howtonestforless says
Thanks Megan! I’m in love 🙂
katie says
WOW! I would have never thought to stencil a washer and dryer! These turned out fab!!!
howtonestforless says
Thanks girl!!
Shirley says
WOW! I would never have thought in a million years to do something like this! I guess I’m the type who has always just accepted how dingy laundry rooms can be! And I’m with you on the broke part, so no new washer/dryer set for me either! But this is a fantastic idea. Especially for someone like me whose laundry room is actually part of the mud room and visitors DO have to walk through it. Thank you for sharing this! (you did a fantastic job by the way!)
Shirley
http://www.etsy.com/shop/ABowForMama
howtonestforless says
Thanks Shirley! Yes, we are always walking through our mud room/laundry room. It’s our main door! So of course I wanted to make a grand entrance 🙂
Tina says
LOVE LOVE LOOOOOOOOOOOOOOOVE!!!!!!! Never crossed my mind— I salute you for the coolest idea ever!!!!!
howtonestforless says
LOL, thanks Tina!
binhtheredonethat says
Love them Erin! A new life for the washer and dryer.
howtonestforless says
Thanks Binh!
Beth @ Free Stylin' says
Great job Erin! Your washer and dryer look so pretty!!
howtonestforless says
Thanks Beth. Hope you’re doing well!
Chelsea @ two twenty one says
Awesome job, lady! Such a great way to jazz up a boring washer and dryer. Can’t wait to see the full laundry room makeover!
howtonestforless says
Thanks girlie! Can’t wait to show you next Monday… although the washer & dryer are the best part 🙂
Jordan says
Oh my gosh!
That is seriously the most clever thing I’ve seen! I have actually thought about what it might look like if you could paint your washer a dryer a different color. But I didn’t think it was actually possible.
What kind of polyurethane do you use?
Thanks for sharing!
-Jordan 🙂
howtonestforless says
Thanks Jordan! I used a Minxwax poly brush on. Worked great!
sara @ applestone drive says
Wow, that is impressive! Very clever and the result looks great. Can’t wait to see the whole room!
Sandra says
Beautiful, and not something I would have thought of, I love it.
howtonestforless says
Thanks Sandra!
Shona says
Erin, that is so stinkin’ cute! I feel your pain about not having a new set, but who needs it with this idea!! I love how you did the door on the washer and left the door on the dryer plain – really cute! Thanks so much for sharing!
howtonestforless says
Thanks so much Shona! I had actually painted the dryer door at first but thought it was too busy. I like it so much better now! Thanks so much for visiting 🙂
Lisa Conforto says
What a marvelous idea! It looks wonderful, and the color is very suitable. Out of all the painting projects iv’e seen this is the winner. I’m going to have to be a copy cat on this one, thanks for the inspiration. You have brought a lot of style to your appliances!
howtonestforless says
Thanks so much Lisa! Good luck on yours 🙂
Karen R says
Wow! I would never have thought of stenciling my washer and dryer, but they look great! What a fun idea.
Jillian says
Love it! Can’t wait to try it on my old washer and dryer! I was wondering if you need to put a primer on the metal first?
howtonestforless says
Nope! No primer needed, but you definitely need a protective top coat to seal in the paint and to protect it from chipping.
Stacye Hixson says
Erin, I have to say you are ingenious. I would have never thought of stenciling my w/d. Kudos! It is beautiful.
Beckie says
Cracking up! I love it!
howtonestforless says
HA! Thanks Beckie 🙂
Taunnie says
Wowza! How clever are you? I am in the same boat-old W&D but not money. I just hide mine behind a curtain because I have never thought to paint them. Now you got my head spinning with ideas. Thanks so much for the inspiration!
howtonestforless says
You’re welcome Taunnie! Good luck with yours. Send me a pic if you decide to do something!
Beth says
What an excellent idea. Thanks for the great idea! I have very similar equipment in my laundry room. I went and bought the same stencil.
howtonestforless says
Awesome Beth! Good luck with your project. Send me a pic when you’re done 🙂
Ansley @ VivaciouslyVintage.com says
OMG I love this! I’ve seen people do the polka dots, but you took it up like 100 levels! Sometimes I wish I had old stuff so I could do fun things with them! My hubby is one where if he bought it, then I had better not touch it!!! lol.
the cape on the corner says
how fun! i love the stencil and the color you chose for them!
Lisa McDermott says
http://www.showeredwithdesign.blogspot.com
such a cute idea! and so simple! Love the pattern. looks great!!
oxox Lisa
Suzan says
Would never have thought of this in a million years!
Fabulous idea – and makeover!
cassie says
those are SO fun! what a neat idea! i would love to hear how it holds up over time, too. if it does well, there may be hope for my washer and dryer, too. cuz i’m kinda broke, too.
Michelle@Faith, Trust & Pixie Dust says
Wow, I love your ingenuity! Your project turned out fantastic. Popping over to your great blog from Home Stories A2Z.
Warmly, Michelle
PS – If it makes you feel better, my friends who have those “front load” appliances don’t like them!
Rose Wilde says
Erin! I nust have missed your post on this. I just saw it shared by Melanie Royals on the Chalk Paint(TM) private message bosrd! What a great ideas. You Rock!
Rose Wilde
Wood Icing
howtonestforless says
Thanks so much Rose! You’re too sweet. I need some more paint so I’ll be seeing you next week!
Bonnie and Trish @ Uncommon says
very clever miss Erin!!!! oh the ideas!!! 🙂
howtonestforless says
LOL thanks girls!
SJ@Sweeter Still says
What a great idea! I would never have thought of this but it looks so cool. The whole laundry room redo is awesome.
Rose @ DIY Eco-friendly Home Decor says
This is just TOO COOL TO BE TRUE ! Fantastic! So, let me invite you to share your creation (and other ideas) at our linky party at http://www.FineCraftGuild.com/party : Look forward to seeing you there! ~ Rose
Tammy @ P K Glitz says
This is such a fantastic idea! Thanks so much for sharing it. I too would LOVE a set of front loading machines but alas, we just haven’t been able to swing it either. I am definitely going to keep this idea in mind and start looking for the perfect stencil pattern for my machines as well 🙂
Linda @ it all started with paint says
Okay, that is such a clever idea to hide my hideous and old washer and dryer! They still work so they’re staying put … but maybe I can make them look better too!
Thanks for the inspiration!
🙂
Linda
howtonestforless says
Thanks Linda! Good luck with yours 🙂
KC says
I did not even know this was possible. It’s something I never thought of! I LOVE this idea! 🙂
howtonestforless says
THanks so much! And the paint has held up wonderfully!!
Brandy says
I love the stencil you used, looks so good!
upcycledtreasures says
I just came across your site via Stumble Upon and this is awesome! I wish I would have seen this before I wrote my stencil round-up post 🙂 I love stenciling projects, my latest was this chevron accent table: http://upcycledtreasures.com/2013/04/chevron-accent-table-with-diy-chalk-paint/
howtonestforless says
Very cool! And thanks so much for the nice comment!
Katie says
Just wanted to let you know that I actually updated my stencil roundup to include this in it 🙂
http://upcycledtreasures.com/2013/04/creative-diy-stencil-projects/
~Katie 🙂
howtonestforless says
Thanks Katie! You’re too sweet 😉
jessica kick says
COULD YOU JUST USE CONTACT PAPER?
howtonestforless says
Yes, I suppose you could 🙂
Jenna Simpson says
I absolutely love this pattern and the final results! I had a question, hopefully its not to silly. Obviously i am a very inexperienced painter, I worry about the paint chipping or scratching off with wear and tear? Is there a clear cot or anything needed that wasn’t mentioned in the tutorial? Or a clean coat is not necessary with the right paint?
howtonestforless says
It will scratch a little bit, but mine actually withheld normal wear and tear wonderfully! I wouldn’t suggest the Annie Sloan wax since it will melt with warmer temps on your dryer. If you’re worried maybe try a wearable latex enamel paint, like Sherwin Williams ProClassic brand. Hope that helps!
Abby says
Love this! Definitely including this idea in my laundry room makeover. You have the EXACT same layout as our laundry room/mudroom. A couple questions – did you have trouble with the paint leaking under the stencil and smudging when you moved the stencil to a different spot? Did you have to wait for the painted area to dry before moving on to a different spot?
howtonestforless says
Thanks Abby! No, I didn’t really have much trouble with bleeding paint. I used a thicker paint (Annie Sloan Chalk Paint) which doesn’t tend to run. Also, it dries very quickly since you’re doing light coats when stenciling. I was able to move the stencil pretty much immediately and place in the next row. Hope that helps!
Denise Saylor says
I just posted this page on my website, I love this idea!
howtonestforless says
Thank you!!
Stephanie says
Love! Do you think spray paint would’ve worked with the stencils?
howtonestforless says
Yes I do! The only thing I would worry about is the paint build up on the stencil and it staying tacky.
teri says
How did this technique hold up over time???
howtonestforless says
Held up pretty wonderfully. Can’t go scratching it because it is paint on metal, but overall wear and tear was not noticeable.
Stacy says
OMG! Thats The most fabulous washer and dryer I’ve ever seen I am in fact going to go do it tomorrow mine right this second. And you said you didn’t have the money to get cabinets but honestly I think it looks much better with the shelves and I’m thinking about pulling out my cabinets and just hang the shelves that is the most beautiful wonder my oversaw wonderful job thank you for sharing
howtonestforless says
Good luck with yours Stacy!!
Janice says
Why did you not stencil the dryer door? I am just wondering if there is a functional reason.
howtonestforless says
I figured with all of the opening and closing of the door, it would be the first area to get scratched and dinged up. Plus I liked the contrast 😉