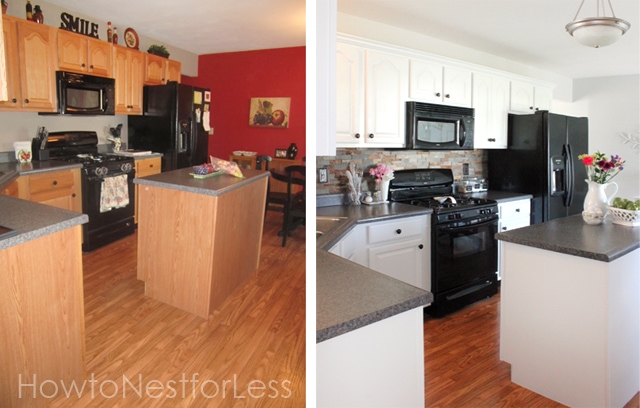
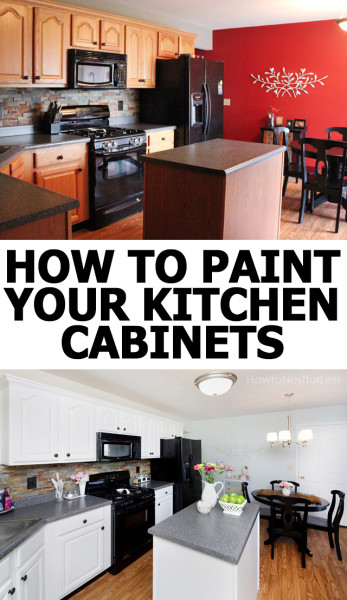
 Yesterday I unveiled to you my Painted Kitchen Cabinets. Yep, all I have to say is what a difference a coat of paint can make!
 Today I thought I’d give you the step-by-step instructions for my process. It truly is an easy task to paint your cabinets, just a bit time consuming. Now I’m sure there’s a bazillion different ways to paint your cabinets, but here’s the process I used…
 1. First thing you’re going to do is take down all of the cabinet doors and drawers using your drill.
 2. Start labeling which door or drawer belongs to each cabinet base. I used sticky notes to keep track. A lot of cabinet doors and drawer faces were similar sizes and it can get very confusing if you don’t have them labeled correctly. Trust me.
 3. Remove all cabinet hardware. Put all screws, hinges and knobs/pulls in separate ziplock bags and label those bags to coincide with the sticky note labels on the drawers and doors.
 4. Now it’s time to start preparing your surface. I used Krud Kutter to degrease all of my cabinet doors, drawers and bases. I scrubbed these puppies like crazy to remove any dirt and grime from the surface.
Even though my cabinets did have a gloss on them, I did not use a deglosser. Instead I used sandpaper like a mad woman. And let me note here that sandpaper will become your very best friend during this process. If you hate sanding things, this might not be the project for you. Just sayin’.
 5. Once you have everything sanded down, make sure you clean up all of the dust with a tack cloth. A little hand vac also comes in handy to get into the grooves of the cabinet doors if you have any bevels.
6. Now it’s time to start priming. Make sure you prop up your cabinets a couple of inches before you start painting so you can easily get the sides covered (I used random projects from around my house like scrap pieces of wood and old baking cooling racks. Make sure you paint on flat surfaces so you don’t get drip marks.
For my primer I chose Zinsser cover stain with the brown label ( and I used less than 1 gallon for the entire project).

7. For around the beveled edges I used a paint brush to really get the paint into the crevices. I used a 1.5 inch brush. Don’t lay on the paint too thick, and work the brush back and forth so you don’t get build up and drip marks.
8. For the larger areas I used a 4 inch trim and cabinet foam roller. This really gave the super smooth finish. I also tried to go over the edges as best as possible to cover where I used the paint brush.
Now when you’re using a primer, it will not 100% cover the entire surface of your cabinets with the first coat. It can look kinda splotchy. That’s ok… it’s still going to turn out just fine. BUT here’s where the work really comes in…
I coated each cabinet door with TWO COATS of PRIMER, and sanded between each coat.
 9. After the second coat of primer was dry and sanded, then I added TWO COATS of Sherwin Williams Pure White satin paint (sanding in between each coat as well).
So again, if you hate to sand, this is probably not the project for you. Cause that was only the back side of the cabinets. Now you have to flip them over and paint the fronts.
 10. OK, once all of your cabinet doors and drawers are painted on both sides, it’s time to begin on the bases in your kitchen. Use painter’s tape to protect all of your countertops, walls, flooring, etc. And then it’s the same painting process as above…
- Degrease
- Sand
- Prime
- Sand
- Prime
- Sand
- Paint
- Sand
- Paint
- Sand
 11. (optional but recommended) Add a coat of polyurethane to your kitchen cabinets. There are many options, such as rub on poly, brush on, wax, etc. Be careful if you choose a brush-on oil poly as it can tend to yellow over time. I would suggest a water-based poly instead, like Minwax Polycrylic.
12. Remove all the painter’s tape and it’s time to reassemble the kitchen cabinets and hardware. Make any necessary touch ups as well (we had one paint drip mark on the side of the kitchen island; just sand out like crazy and repaint).
 And here’s some answers to questions I’ve already gotten:
- No, you can’t see brush strokes
- Yes, you can see a little of the wood grain in the cabinets still, but it looks fabulous
- I used Sherwin Williams ProClassic semi-gloss paint in Pure White (and it’s an acrylic interior paint and made for cabinets)
- I painted the insides of the cabinet doors, but did not paint all of the shelves or the insides of the bases
- This project probably took me about 40 hours total if I added up all my time
- I didn’t use a paint sprayer because I have never used one before and was chicken. Simple as that.

Here are the final costs of my Kitchen Cabinet Makeover:
- 1 gallon of Sherwin Williams ProClassic acrylic cabinet paint in Pure White – $40 (purchased during sale)
- 1 gallon of Zinsser cover stain primer – $23
- Paint brushes, rollers and sandpaper – about $30
THAT’S A TOTAL OF $93!


Please feel free to ask me any questions and I’ll try to answer them to the best of my ability!
ALSO SEE THESE POSTS:
KITCHEN CABINET REVEAL
TIPS & TRICKS FOR PAINTING YOUR CABINETS
MOM’S KITCHEN CABINET MAKEOVER

Olivia Watson says
Your kitchen looks marvelous. It is worth of 40 hours of work for sure. I am going to give a new look to my kitchen cabinet next week. Usually painting seems to me as a mammoth task but you make it so easily.
Good work!!
howtonestforless says
Good luck Olivia! Send me some pics when you’re done. I wanna see!!
Katie says
I would be chicken to spray them as well. Brushing is something I’m familiar with and much easier for me. I used that Minwax Polycrylic on my son’s dresser. Glad I did. I think I’ll use it on my mudroom shelving unit as well.
howtonestforless says
The brush turned out great along with the trim roller! I feel like I had great control, and wasn’t sure if I’d have that with the sprayer. Good luck on finishing your projects!
Jenny says
They look great! When we bought our house, the people before us had painted the cabinets. The only problem is, they didn’t prep it at all and the paint was sticky and peeling. I did the bathroom cabinets on my own, but was too chicken to do the kitchen cabinets, since they are at eye level. I found a guy to paint them and he did an awesome job. He used a sprayer and they are so smooth. He took home all of the doors to work on at home. He said it did take quite a while to prep them.
The total was $1700 with new inside hinges and door knobs. Way more than doing it myself, but so worth it, as sanding is not a fun pastime of mine. LOL!
howtonestforless says
HA Jenny! I know, sanding is annoying! $1700 ain’t too shabby either for basically all new cabinets…although I like my $100 price tag much better 😉
Cheryl @ That's What Che Said says
It looks great Erin! I also love your cabinet pulls! Great job!
howtonestforless says
Thanks sweetie!
Shannon Fox says
It sure looks fantastic!! All your hard work sooo paid off to have this beauty of a kitchen 🙂
Ashley Simpson says
You have done a great job indeed. It seems very cost effective to me (only 93$ !!). The kitchen looks really gorgeous!!
Thanks for sharing 🙂
howtonestforless says
Thanks so much Ashley! One of the cheapest improvements I’ve made in my home with the biggest impact!
Christina @ The Frugal Homemaker says
Your kitchen looks great, Erin! Huge difference with the white cabinets.
Painting our cabinets are on the list too. Ours are already white but have a horrible finish. So need to sand and repaint them. Then have new knobs to add too. 🙂 Was hoping to get it done this year but looks like it will be next Spring now.
howtonestforless says
Thanks Christina! Painting your cabinets would be a great winter project… well, maybe after the 1st of the year! Good luck 😉
Thalita says
I just recently painted my own cabinets! A scary thing to do, but they turned out beautifully and with no sanding! Liquid de-glossers are a lifesaver for those of you who don’t want to spend hours playing with sandpaper! It’ll add about $30 to your budget, but it’s well worth the “splurge”!
howtonestforless says
Glad to know those work well, Thalita. I was a little nervous about using it but happy to hear you rocked it!
Annette White says
Love it! I can’t wait to show this to my husband. I’m going for it. This step-by-step is all I need for the job!! I’ll let you know how ours come out.
howtonestforless says
Awesome Annette! Can’t wait to hear all about it!!
Brittney Bergman says
Might be a silly question, but did you paint the under-side of each cabinet base? Meaning the bottom part of upper cabinets that hangs over the counter-top… I am starting this process this weekend, and that was a funny question that popped into my head. Just wondering! Thanks for the tips.
howtonestforless says
Nope, didn’t paint underneath! Good luck with your makeover!!
Teralyn Byrd says
Love this!
My bff and i share links to different blog posts for inspiration and yours commonly comes up.
Do you wish, hindsite, that you would have painted the inside of the cabinets?
I would have to paint the bottom of at least some of mine bc they are high above the sink and the bottom is easily seen.
I also love the crown molding you did
Nem says
Looks great. I love white cabinets.
Is satin paint the best paint for kitchens?
I lived in a rental once and they painted the cabinets, except when you close and open the doors and drawers the paint would cause them to stick. Do you know how to avoid this?
howtonestforless says
I would suggest using a high quality paint, like Sherwin Williams. I’ve never had any problems with tackiness or sticking. Plus I’ve never had any chips either, even with kids!
Kim says
i did my bathroom vanity in exactly the paint and sheen you did.. I waited the allotted time between coats.. did 2 coats of prime, saning and then 2 coats of paint..sanding between.. I waited a couple days before hanging the cabinets back up and installing hardware.. I kept getting scratch marks where my stupid nails keep hitting the cabinet when i grab for the knob,, did you top coat yours with poly?? and how long did you wait to rehang everything after you finished painting?
Michele Chandler says
I’ve hated my kitchen ever since buying my house 3 years ago and am looking for ideas. I was drawn to yours because, like you, I also have all black appliances. Currently the cabinets are a medium brown and the walls are a medium shade of (gasp!) mint green. It’s a very small kitchen and I was thinking of repainting the cabinets white, but wondering what to do for the walls. If color, I would lean towards a light blue shade (if not white). I had never remodeled anything so I am taking a leap of faith in redoing this! The old countertops are currently off-white but was thinking they will eventually be replaced or painted (also read about doing that). I have no tile experience either, (or tools to cut them), but have considered the small tiles in an even pattern. Ok…any suggestions/ideas??? THANK YOU! 🙂
Michele Chandler says
Just FYI-The floor is also currently an off-white tile with light colored specks.
howtonestforless says
I absolutely LOVE the idea of light blue walls. I think they would look wonderful with black appliances and white cabinets. I think you could find some really nice backsplash tiles too that go with the new color scheme. If yo’ure uncomfortable with tile, check out thesmarttiles.com. They’re actually peel and stick mosaic tiles so you really can’t mess them up! Tons of colors and designs too. YOU CAN DO THIS!! Definitely keep me updated. I’m excited to hear how it all turns out!!
Sue Hawkings says
can you tell me please the grit # of sandpaper for inbetween coats of paint?? I can’t wait to get started!
howtonestforless says
I actually used a medium grit sanding wedge. I feel like I have more control with one of those!
Sue says
Thanks so much for your great tutorial and answering my questions! Spring has finally sprung and I’m itchin’ to get started – buying the paint and supplies this weekend 🙂 Have a wonderful day!
howtonestforless says
Awesome Sue! Make sure you send me some pics when you’re done. Can’t wait to see it!!
Liz B. says
Why did you sand between coats of primer & paint? Just curious. About to redo my own.
howtonestforless says
Just a real light sanding. Just enough to make it smooth where needed. Hope that helps!
Ted Wood says
Your kitchen is beautiful! I’m getting ready to do mine… were the primer and paint water-based? I’ve seen others recommend oil-based, but i hate using that so much. Thanks so much for your help!
howtonestforless says
Yes, primer and paint were both water based latex. If it’s a good brand of paint, you’ll have no problem with the curing and durability. I’m not a fan of oil paints, especially since they can yellow over the years. Good luck with your transformation!
Gayle says
Excellent job! The cabinets look amazing!! Are they satin finish, high gloss, etc?
howtonestforless says
Thanks Gayle! We used a satin finish. Just enough shine and still easy to wipe down!
Brian says
Just curious – did you use a coat of polycrylic? It’s not in your list of expenses, and I wouldn’t be able to tell by looking at it. Do you have a recommendation for the finish of the polycrylic? Thanks a lot.
howtonestforless says
No, I did not use a poly coat on my cabinets or when I did my mother’s cabinets. Both have held up wonderfully with no knicks or chips. If you use the right paint (like an enamel), you will not need a top poly coat.
Tiffany says
I love your kitchen! Awesome job! I have currently started to tackle this but am still nervous about it turning out as beautiful as yours! I have primed the one side of the cabinets and will be sanding away tonight! Wish me luck and any tips appreciated! 😉
howtonestforless says
GOOD LUCK TIFFANY!!!!
michelle batten says
Hi Erin. I just discovered your blog (it’s great, btw) and read your post from October 2012 about painting your kitchen cabinets white. I’m about to have my kitchen cabinets painted white and was looking for kitchen inspiration. I too have all black appliances. Our kitchens are similar and I’m interested in replicating your kitchen look. Two questions:
1. What kind of countertops do you have and would you happen to know the brand/name and color:
2. Love the backsplash. It plays nicely off your floors, and I have similar floors. Where did you get it? Do you know the name? How/where can I find it?
howtonestforless says
We have laminate countertops. Not quite sure of the brand but it’s a medium gray tone. And we purchased the backsplash from Lowe’s. Here’s the link from that post: https://howtonestforless.com/2011/10/17/stone-kitchen-backsplash/
Hope that helps! Good luck to you!!
Kellie says
Awesome job!
What colors would you recommes for a small kitchen with same color cabinets as your orevious with matching laminate counter tops, yellowish linoleum floor and soon to be matching black appliences..?
I NEED the kitchen to look bigger and brighter. We have a 28 year old house….getting it ready to sell.
Thanks,
Kellie
Kellie says
Also, we want to do something about the hideous yellowish linoleum floor….but that’s another project on another day.
I love how you put the wood floors with the black appliances and white cabinets and grey countertops….its all put together with that amazing back splash!
~Kel
howtonestforless says
Paint the laminate floors! You already hate them and want to replace them, so why not paint for now? DO IT 😉
howtonestforless says
What color is the laminate? White cabinets are always my favorite!
Laura says
Hey! The cabinets look great!
Wondering why you didn’t paint the insides?
We are buying a house that reallllly needs a facelift in the kitchen – so I’ve read like every tutorial to gain confidence… Ours totally need inside painting though 🙁
howtonestforless says
We painted the back sides of the doors, but the insides of the cabinets were quite clean and not very old. Did you think of maybe wallpapering the insides with paper that looks like bead board? Otherwise painting the insides is just another step, but will hopefully go quickly for you!
Marsell says
Hi It looks really pretty and I have used a sprayer before so that would go quicker. My question is since some time has passed, does the paint on the cabinets hold up? Have you had any peels? My kitchen is oak and similar looking to yours before large and I am replacing coutertop to granite but thought about just painting the cabinets to keep the costs down. I am afraid about the wear and tear on the doors. Any info would be appreciated! Thank you
howtonestforless says
My mom’s cabinets still look amazing! Her cabinets were 30+ years old when we painted them and have held up wonderfully. No problems at all with peeling or major chipping.
Pam says
I am so proud of you for having the guts to take on this project, and thanful that you shared it with others. Your kitchen looks amazing!
howtonestforless says
Thank you!
Audrey says
Hi, great blog! I feel like we have a very similar tastes and very similar looking homes (weird coincidence!) so I’m really happy to have stumbled onto this one. I know this question was only asked last year, but I want to ask again as an update: How is the paint lasting now? Have you had to make any touch ups? If you were to do this project again, is there something you would want to change? Also, why did you chose not to do a top coat? I’m looking to paint my kitchens very soon and I’m on the fence on types of primers, paint brands, and whether or not to do a top coat so any advice is helpful. Thanks!
howtonestforless says
While we moved out of our last home so I can’t give a full update there, I painted my mom’s kitchen cabinets about three years ago as well and they still look awesome! No touch ups even! I wouldn’t change a thing 🙂
https://howtonestforless.com/2013/07/22/moms-kitchen-cabinet-makeover/
Paula says
You did a fabulous job!
I am in the process of painting our kitchen. Our house was built in 1991, so lots and lots of oak…..ick! Anyway, I decided to do a trial run in our small half bathroom, and even though I have 20+ years of painting under my belt, I am experiencing painters remorse. I know that I can stop now but I just feel that the white is cleaner and fresh looking and looks stunning. Everything that I have researched, and believe me I have many, many hours invested, with the before and after photos, it is such a huge improvement. Did you go through this yourself?
howtonestforless says
Yes, I had a little bit of painter’s remorse because IT TAKES FOREVER! But I have to say it’s TOTALLY WORTH IT! Such a clean, bright, new feel to the kitchen. So happy with both kitchens I’ve painted over the years. Good luck to you with yours!
Jennifer says
How many hours for drying between each coat of primer and paint?
howtonestforless says
Just a few hours!
Debbie says
Hi Erin,
After finding your blog and your tutorial on tackling this huge project, I jumped in head-first. I don’t have near the amount of cabinets that you do but it was a challenge just the same–both being disabled required us to muster up strength we don’t have.
My kitchen is in a small double wide 1990 manufactured home that we just purchased in May. The cainets were a horrid shade of YUCK and had thermofoil on them. I used a blow dryer to heat the thermofoil up and remove it after watching a video on YouTube, then I used your technique for painting the cabinets. I’m in the process of stripping the final door and am painting the next to the last door. I decided to paint the interiors as well because they were just the bare unfinished pressed shelves. I then lined them with a vinyl wallpaper (un-pasted) If there were a way, I’d send you the photos to show you what a huge difference there is in the cabinets! Oh and a friend also raised the cabinets six inches to accommodate our new “above the stove” microwave!
I have you to thank for the courage to do this project in the middle of packing up the old house and working on other projects in the new house. We painted the walls in the whole house, a friend helped us to rebuild our privacy fence, installed new water lines–we had help with that, and installed new skirting. Then we were moved to the new house and went back to clean the old house……all in under 6 weeks time. Some days we could only work an hour or two but others we’d work all day and take a lot of rests.
We’ve been in the new house just a month now. I had to quit working on the last of the doors to take a little bit time off for a surgery I had to have, but have now resumed working on those last two doors just to get a rest ::wink wink:: and get the kitchen all finished. It is going slow but I know with your process, I can finish the kitchen and the two bathrooms’ vanities plus the cupboards in the laundry room too! Thank you, thank you for sharing your beautiful kitchen. It gave me the push I needed to accomplish what I needed to do.
howtonestforless says
What a sweet message, Debbie! Sounds like you’ve been quite busy with the new home! I would love for you to send some photos so I could see the before and after.
Hope you’re healing well and enjoying a bit of rest before getting back at it again 😉
Thanks again for the comment. Made my day!
Sam says
Great job and thanks for the tips. Curious which blue you used for the blue wall? Thanks!
Teresa Alto says
Great information!! Thank you!