Make sure you follow me on Instagram and Pinterest for a sneak peek into my recent projects!
So while we’ve been staying at my bachelor brother’s house, I’ve been trying to do some minor updates to his home. One of the areas I really wanted to tackle was the kitchen, but on a budget.
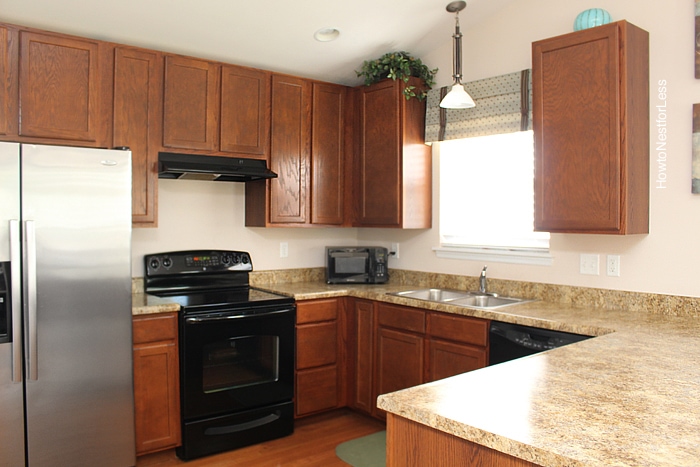
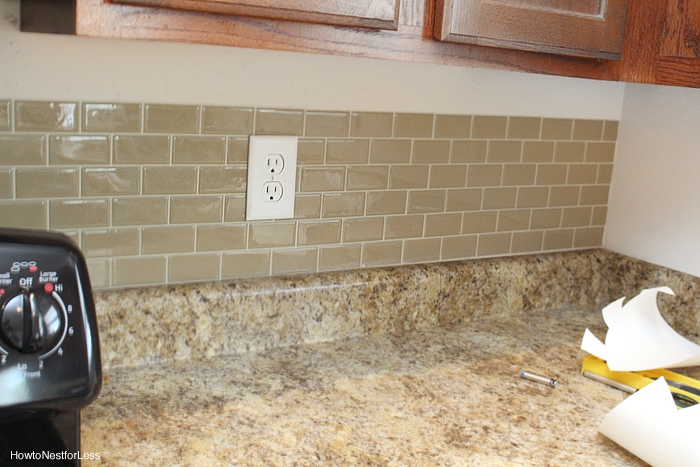
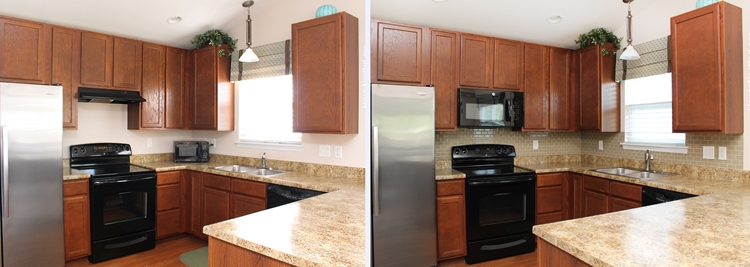
Our goal was three things: backsplash, faucet with pull out spout, and a microwave above the stove to create more countertop space. Here’s the before…
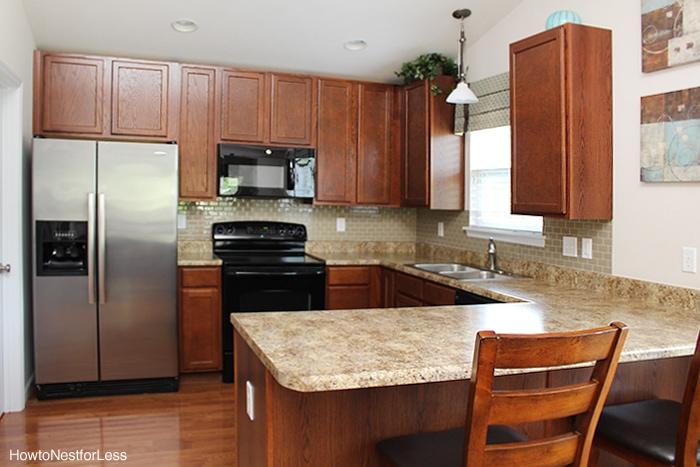
And here’s what it looks like with the mini makeover…
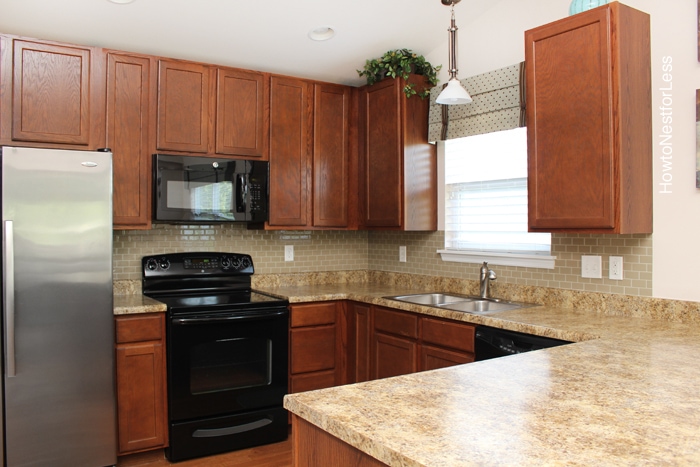 I have to say, it’s amazing what a backsplash can do for a space!
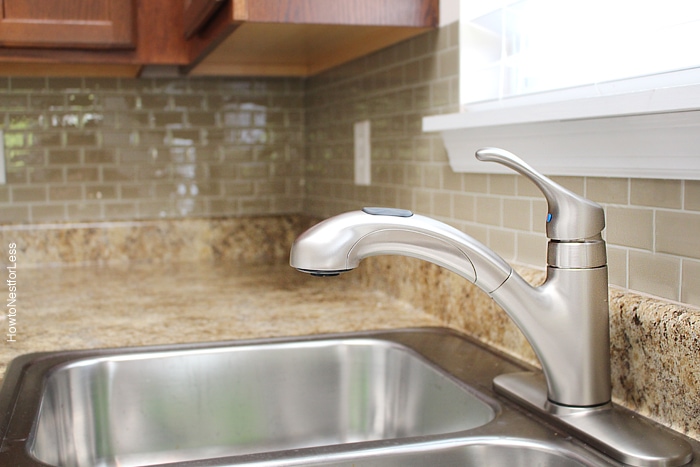
Now in our last home we installed a ceramic white subway tile backsplash in our kitchen, but in my brother’s house we decided to go with a temporary version… a peel and stick option from Smart Tiles. We did this for a couple reasons, mostly because he might be switching from laminate to a hard surface countertop plus we wanted to stick to a budget.
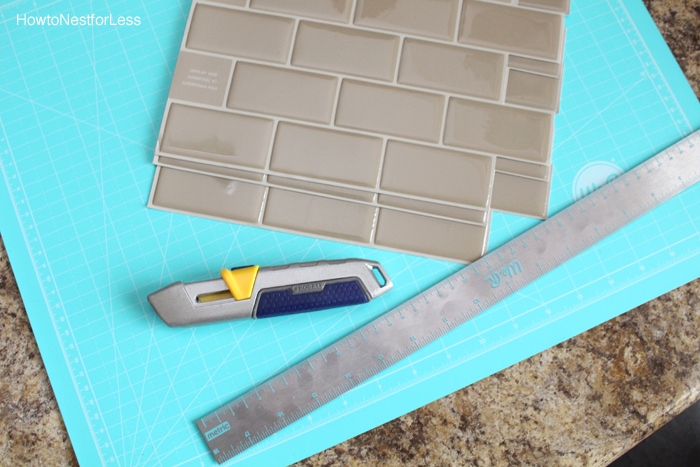 Supplies you’ll need for the backsplash:
- Smart Tiles or any self adhesive wall tile
- Utility knife
- Metal ruler or straight edge
- Level
- Cutting mat
You’ll want to start with an inside corner and work your way out from both sides. Cut the first tile straight so you have an flush starting point in the corner. Use the level to make sure everything is even.
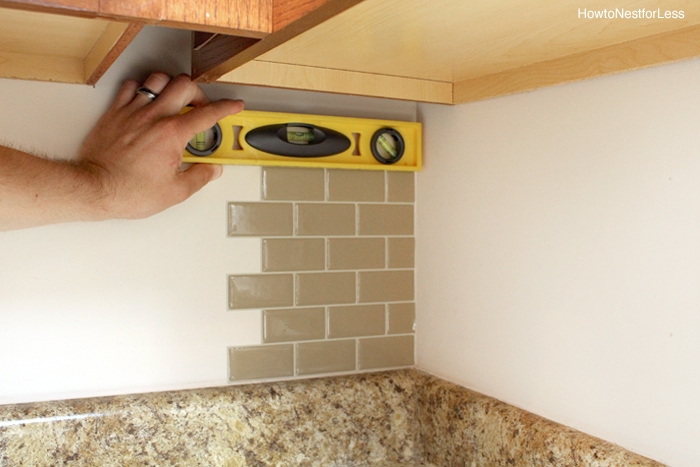 Then continue on overlapping the grout lines, trimming out areas for outlets with the utility knife or scissors. Hold up the tiles in place first to make sure it will fit properly before taking off the backing. Once you take off the backing, press firmly into place (I used the back side of a spoon to help).
 Then you’ll start on the second row above your first. This second row will require a lot more trimming of each piece than the first row since you’ll want it to perfectly fit underneath your cabinets. Also make sure you take your time around windows and light switches (measure twice, cut once).
And pretty soon your kitchen will look like this…
We were actually quite impressed with the look and feel of this self adhesive tile, not to mention the ease of installation. I completely installed this in one evening all by myself (took me about 4 hours total).
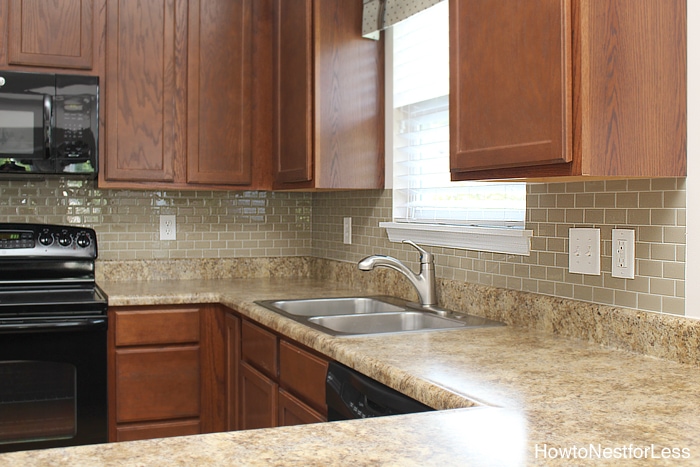
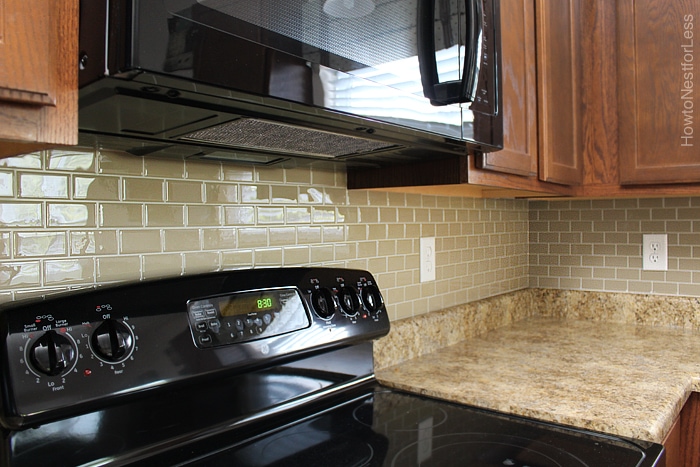
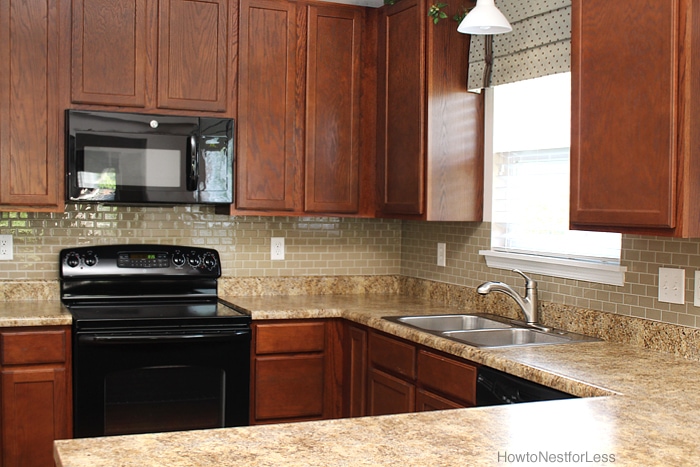
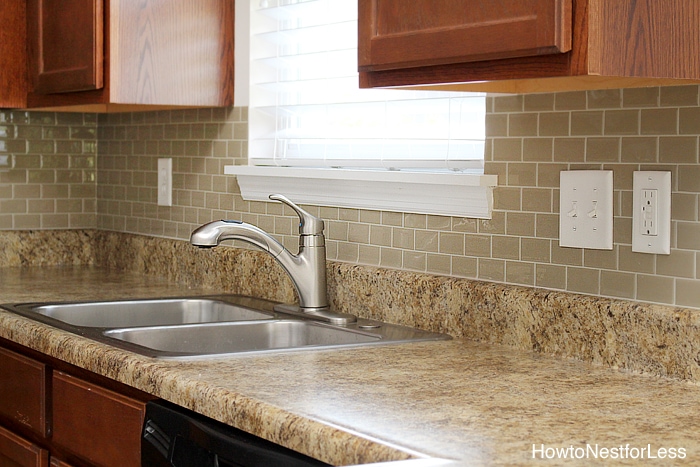 As you can see, the other big additions to the kitchen were the above-the-stove microwave and the new pull out spout kitchen faucet. You can get more details on how to install a faucet here.
 microwave + faucet + backsplash = 1 awesome mini makeover
Overall I’m super happy with the before and after mini kitchen makeover. It’s simply amazing what some simple updates can do!
 The Smart Tiles were purchased from Joss and Main, but I think you can get them online from other sources. Check Wayfair as well, they often have sales on this product plus tons of other color options.


michelle says
i was wondering if the walls had a lot of texture? what kind of paint? I’ve tried to use the sticky quotes, wall décor that is sticky backed but they don’t stick on our walls. did u have any problem with them sticking? thanks so much for this resource~ we have the same type of counters (with the lips) we want a black splash but know that we WILL change the counters out when funds are available. so we’ve held off doing the backsplash.
howtonestforless says
We didn’t have any texture on the walls, just normal flat builder paint. We didn’t have any problems with it sticking though. I did have to go back about a week afterwards and press down some spots, but since then nothing has bubbled!
Carla says
It went up like a breeze but did not stay adhered to walls. I kept glueing until I gave up and removed it. I am going to use a spackling to cover the glue and torn drywall and paint over it.
Pat says
Wow! Great job, Erin! Everything looks amazing! You are so right about how much better a backsplash can make a kitchen look! Oh, and the microwave and faucet looks wonderful as well! I love it!
howtonestforless says
Thanks Pat! Just covering up those food stains on the walls behind the stove was a huge help 😉
Toni Counts says
L-O-V-E it!!! I’m adding this to my To do list right now!
Wendie says
Wow, amazing difference. You can come stay at my house any time!
Melissa says
That looks great! Your brother is really lucky you have come to stay. LOL! I love how much more upscale the kitchen looks. Wonderful job!
Jamie says
Looks great! I have never heard of smart tiles, I’m going to definitely look into them. I have been putting off doing my backsplash mainly for the reason of it looks like a pain in the rear! This looks pain free!
howtonestforless says
You could actually cut it with scissors it was so easy! Hardest part was around the window but I did the entire thing BY MYSELF in ONE NIGHT! Yes, I had to caps that b/c I’m quite proud of myself 😉
AMOORE says
ive seen these at Lowes. A litter pricey but cheaper and easier than tile and grout and backer board.
Vicki says
Did you remove the light switch plates or just go around them?
howtonestforless says
Removed them!
Shelley says
can these be used in a bathroom
howtonestforless says
They’re resistant to humidity so you can put them in bathrooms, just not in a shower due to the adhesive.
Sharon Maines says
Where do you get the tiles?
howtonestforless says
I got mine from Wayfair:
http://www.wayfair.com/Smart-Tiles-C1825620.html?redir=smart+tiles&rtype=6&dept=0&ust=
Erin says
This is awesome. Does it look like real title? My husband isn’t into DIY but this looks so doable I would love to try myself!
howtonestforless says
It’s a little smaller than actual subway tile, but it looks awesome in person once it’s up! Definitely worth trying. And I love it so much, I plan on doing it in my laundry room behind our utility sink.
Tonya says
What color / pattern did you use? They look great.
howtonestforless says
These are the ones I used:
http://www.wayfair.com/Smart-Tiles-9-x-9-Mosaik-Self-Adhesive-Wall-Subway-Tile-in-Sand-SM1022-1-SMRT1012.html
Jeap Phomsoupha says
How clever!! I’ve been looking all over to find a simple and budget friendly way to do a tile back-splash in my kitchen. I’ve never seen this product before. Thank you for sharing!
http://www.lovelyonadime.com
Sherri says
Great job!!! Looks fabulous!!
I’m wondering if this would work in a rental home/apartment? Is it easily removable?
howtonestforless says
I didn’t try to remove it so unfortunately I dont know how well it would peel up. Sorry!
Nadine says
I have seen these done on thin plywood then attached to the wall with 3M strips or screws or another less permanent adhesive, so that a backsplash can be added to a rental kitchen. You cut the plywood to fit the area where the backsplash will go, then adhere it to the wall, then add the backsplash. You would need to add silicon seal that matches the grout color on the edges where the board ends and the wall begins, to make it look finished. I have not done this myself.
sandra says
I know this is an old post so my reply won’t help you but I hope that it will help others who see this. Smart Tiles are NOT removable and may remove the paper coating from the sheet rock on your walls. I used Smart Tiles in my bathroom and it looked great. Until I decided to remove them so that I could repaint my bathroom. It took big chunks of plaster off the walls in some places.
howtonestforless says
Good to know, Sandra. Thanks for the update and tip!
Mary says
I’ve been thinking about doing this for a while- do the tiles look “real” up close? Peel and stick makes me nervous, but your backslash looks so awesome!
howtonestforless says
People have been quite surprised that it isn’t real tile when they visit my brother’s home! The tiles are smaller than normal subway tiles and are shiny, but I think it’s an awesome solution. I’ll be using them in my laundry room, too!
Liz says
They look great! I’ve wondered how well they look installed, I’ve only seen the pics from the folks selling them, so I wasn’t sure if they’d really look so good in real life. So it’s so good to see yours… 🙂 thanks for sharing this!
howtonestforless says
You’re welcome! I’m actually going to use them again in our new kitchen… thinking of trying the white subway tile!
Candace Clark says
I read your article last night and was super excited! I was at a loss as to how to update my backslplash. Got up this morning and started searching for Smart Tiles and found them at the local big box store. Tonight I have a beautiful new backsplash! My husband was very impressed! Thank you for sharing!
howtonestforless says
Awesome!! We actually used again last weekend in our new kitchen. Love them!
Virginia says
While I love the back splash, I would never take down a vent over the stove to put up a microwave, I think the fans on the microwaves stink. There are not powerful enough for heavy cooking.
howtonestforless says
Well to each their own. My brother isn’t a big cook, mostly eggs for breakfast and rice for dinner to go with his chicken. Definitely no heaving cooking going on in here!
Phyllis Snyder says
I have seen these sold at Lowes , Menards, Home Depot and Joann Fabric carries them as well. They do look very realistic .
Christy says
Does the peel and stick backsplash stay in place. I hear that it gets loose and falls off of the wall.
howtonestforless says
We’ve had them for over 2 years and not one issue!!
Mimi says
I have green and black mud tiles already in place (, they are original to the house) but I’m wondering if i can put these on top if them to update the look of the kitchen..
I would have to ” gut” other wise..
Has anyone tried that?
howtonestforless says
Yes, their website says you can put on top of existing tile!
Eva says
I am seriously considering this idea soon. How many boxes of sheets did you need or use? I have relatively the same size kitchen. Thanks