My kitchen is definitely not my dream kitchen. And due to our design ignorance, when my husband and I built our first home together 6 years ago, we picked out gray countertops, builder grade oak cabinets, and no stone kitchen backsplash. Blah!
The gray countertops against the orangish oak cabinets never made sense to me and I wanted to upgrade my kitchen desperately. While we don’t have money to rip out all of the cabinets or purchase new countertops as of now, we decided a backsplash was our best option to tie the kitchen together on a budget.
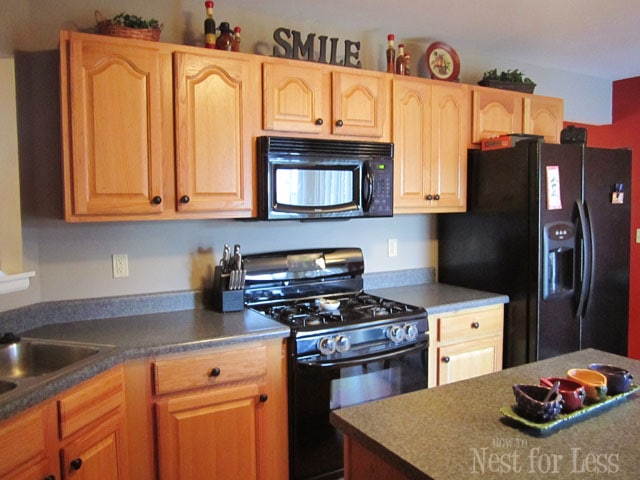 While searching the aisles of our local Lowe’s, I found this wonderful stone for the backsplash that incorporated both shades of gray and orange. Absolutely PERFECT!
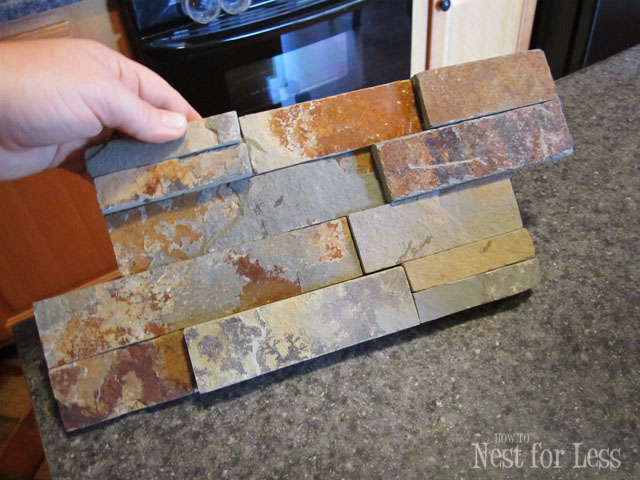 This project was a little beyond my DIY skills, so I hired my neighbor to complete the job! I would walk you through the process step by step, but as I said before, hand off on this one!
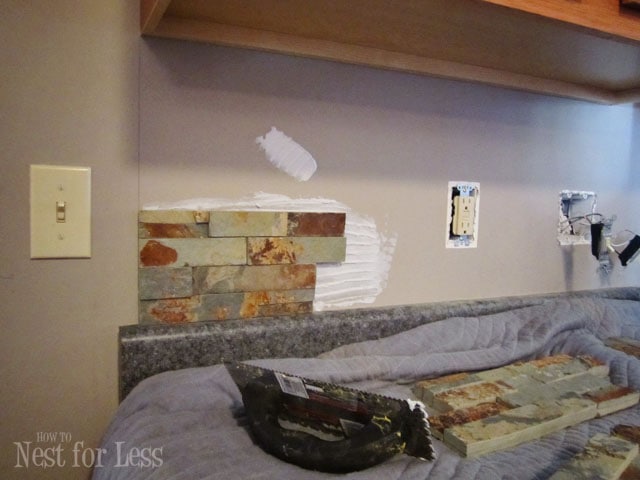 I can tell you that we rented a wet saw, purchased some supplies and got to work! …and first stone is up!
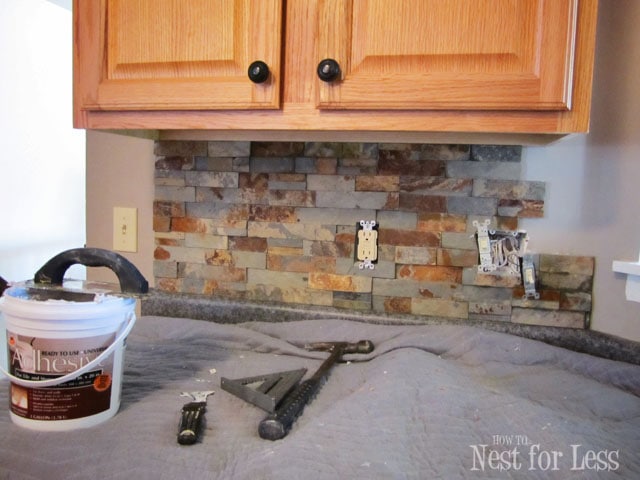 OK, making some progress. We actually decided to replace all of the outlets and light switches to oil rubbed bronze hardware. We purchased that from Lowe’s as well.
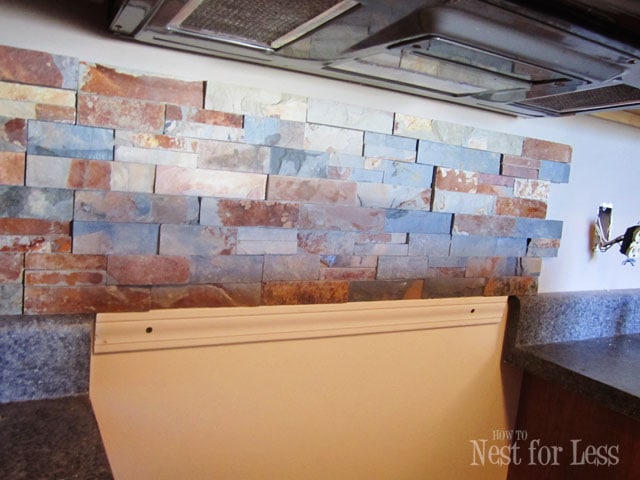 Behind our stove we needed to add a piece of wood trim to bear the weight of the stones since it didn’t have the laminate backsplash to hang on. Just two screws in the trim piece and we were ready to rock. Once the adhesive cures, we can remove the trim (although we’ll probably just keep it up since it’s not hurting anything!).
Ready for some after shots? Just to warn you, there’s a bunch!
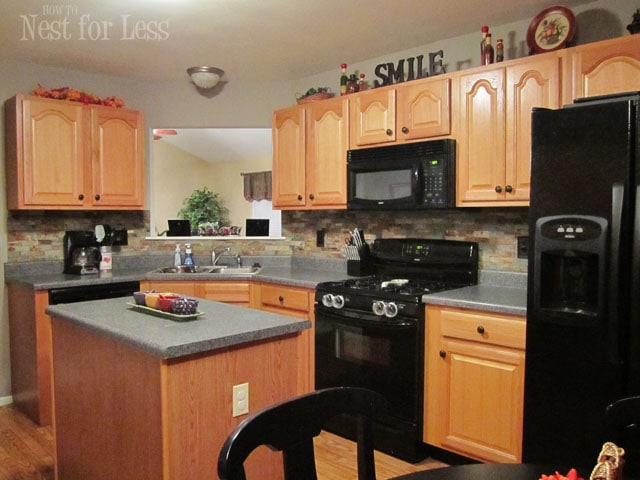
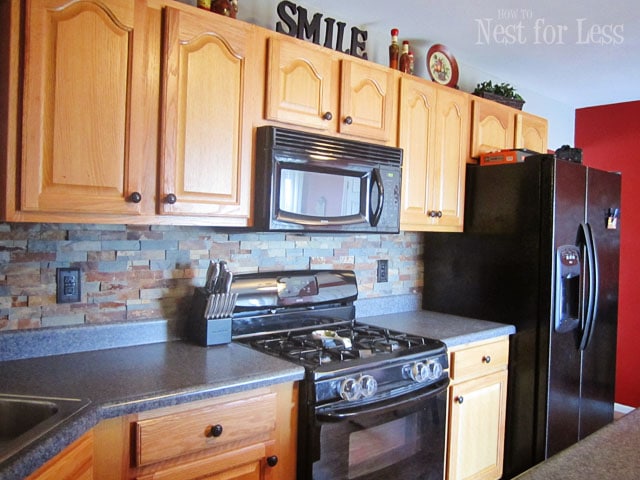
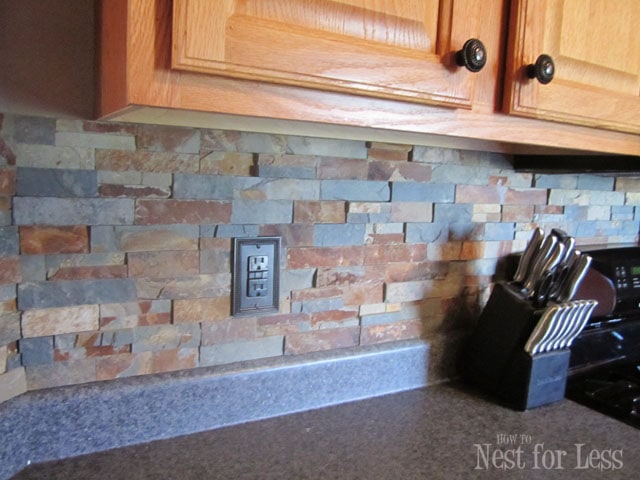 The colors seem to change throughout the day! Some of these shots are during the day with an abundance of natural light, while some others are at night with just ceilings lights on. Lovin’ it any time of day!
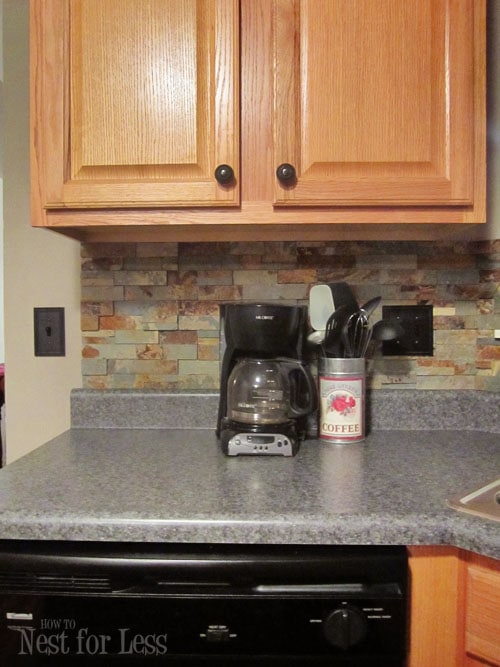 Such a great idea to switch out the cover plates and actual outlets to match my new stone kitchen backsplash! And don’t you just LOVE the texture and varying depth on the stones?
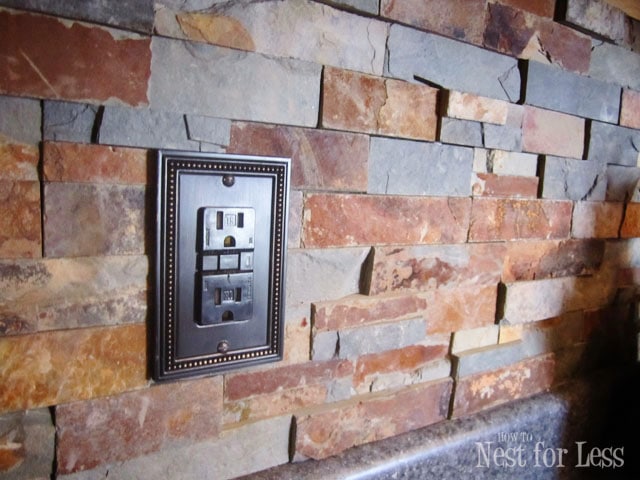 This stone kitchen backsplash from Lowe’s was about $25 a box (includes 6 pieces in each box). To complete the entire kitchen backsplash and desk area, we used 8 boxes. We also had to purchase 3 electrical outlets and 2 light switches in the oil rubbed bronze. Not too shabby to transform the entire kitchen for under $350 in materials!
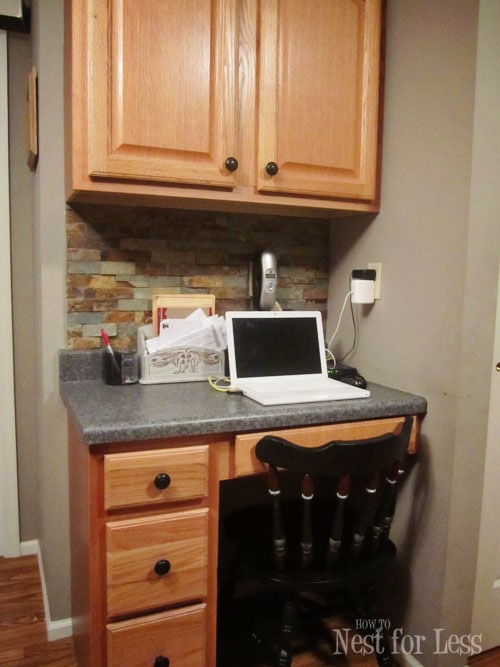 View of my kitchen desk where I pay bills. A little messy but functional!
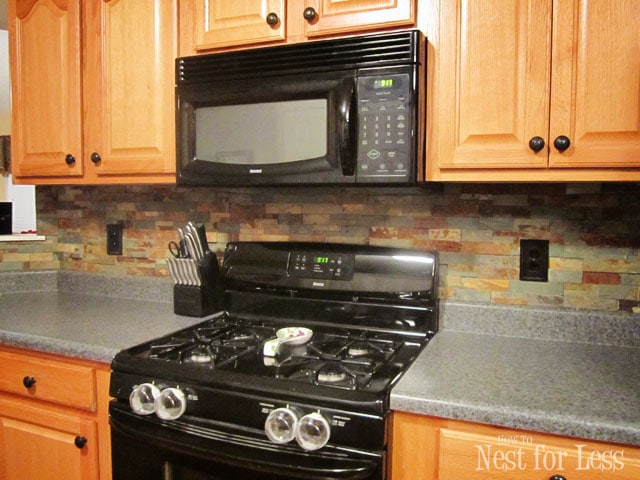 Yes, love how the orange and gray really pull from the stone kitchen backsplash to match the countertops and cabinets. It seems to all make sense now! So again here’s the before and after!
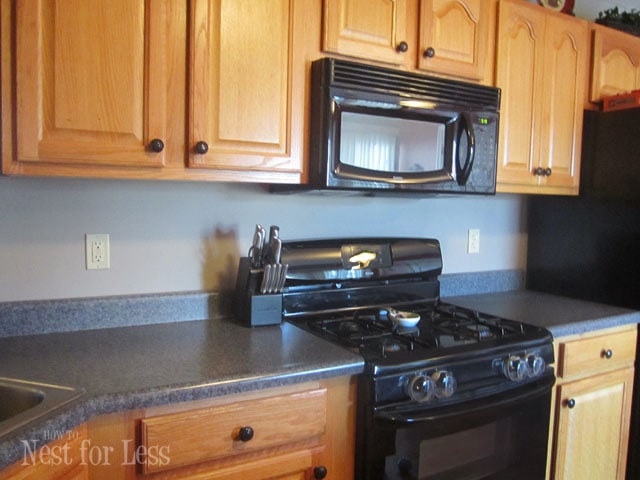
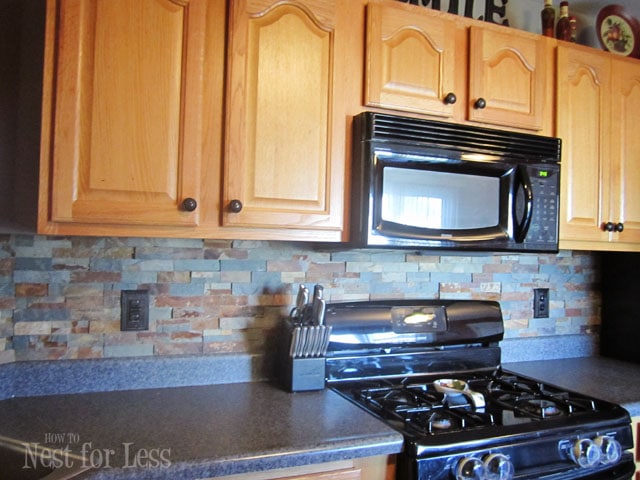

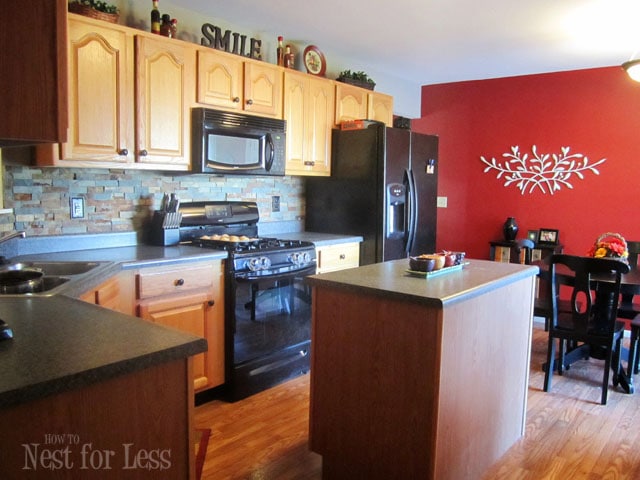 Thank you to our neighbor Jon for doing such a FANTASTIC JOB! I couldn’t be any happier with the outcome. It’s just amazing to me what a cheap fix can do to your space!
AND I’m super excited to get crown molding on my cabinets this Friday. WAHOO!! I’ll definitely be sharing that one next week 🙂

Debbie~refreshrestyle says
Your tile looks wonderful! Love it!
Olivia says
Wow! That look so good!! we’ve been trying to decide what sort of backsplash to do in our kitchen. I think I’m going to check this out at Lowe’s and see if it will work for us. I can’t believe what a diff. it made. Good job! Btw…love your blog.
Laura says
Looks beautiful! I love it! And you are definitely “nesting for less” for $350!!
Lindsey Muenz says
It looks really good! Have you thought about painting your island cabinet black?!
howtonestforless says
I would love to add bead board around the entire island and paint it! Now I just have to muster up the courage 🙂
FlipChick Designs says
Wow! That is BEAUTIFUL!
Megan Brooke says
Looks great Erin! The backsplash tile matches great with your cabinets and countertops 🙂
Kathryn Griffin says
That stone backsplash made all the difference! Beautiful!! Have a grand Monday! Toodles, Kathryn @TheDedicatedHouse
Kari says
Erin it looks so so great! Now you have a reason to love the cabnits and countertops, it all goes together great!
Jane @ Cottage at the Crossroads says
Your backsplash makes such a huge difference in your kitchen! It looks fabulous. I agree with a previous commenter about painting your island. You know, one change always leads to another!
Condo Blues says
I have Oak builder grade cabinets too. On alternate days that end in a Y I want to burn them or smash them off the wall in a fit of meh. I like your tile! I think it will work around my fireplace. I have lots of browns and tans but in my heart I wish I had slate. Your choice is the best of both worlds.
Diane Jaquay says
This looks TERRIFIC!! I would love to redo our kitchen but like you we don’t really have the money to do everything I’d like to. Perhaps a fix like yours is in order!
Angie @ Bigbearswife says
that looks beautiful! I love the new stone back-splash
Audra says
I love it! It really does tie together well now! Great find.
Patty says
What an amazing transformation! What a great choice. I’m very happy for you 🙂
Deborah says
Isn’t it WONDERFUL when we find a solution that works so beautifully for us!?
Would be tickled pink if you visit my little space too…Deborah.
[email protected] says
Hi there- I’m your newest follower from a linky party! Love the backsplash! Love it!!!
I’m so excited to snoop around your blog! Do you currently live in St. Louis?
We were out there visiting SLU for our daughter’s college plans. Following from
http://imnotatrophywife.com
[email protected]
howtonestforless says
Thank you so much, Laura! Yes, currently living in STL. Very cool that you were looking at SLU! Hope you like it 🙂 I’m your newest follower!!
[email protected] says
ps… i smell a cabinet project coming your way! laura
Jenny@EvolutionofStyle says
This really ties everything together beautifully! I love the stone and the texture it brings in as well. Did you apply it right to the drywall? Did you need to put up any sort of backerboard or anything, or is it ok since it’s resting on the laminate backsplash?
howtonestforless says
It’s resting on the laminate backsplash so we didn’t need to apply anything to the drywall luckily! The only place we had to add support was behind the stove.
Kim says
Way to kick it up a notch. Great job. Love your kitchen and love your blog. I’m a new follower. Pop over for a visit sometime!
xoxo,
Kim
Sarah says
Hi Erin! I’m in St. Louis, too! We have nearly the same exact kitchen – except mine still looks like your “before” picture. I love the warmth and texture that the stone brought to your kitchen. Newest follower!
howtonestforless says
How cool!!! GO CARDS 🙂
Dee says
The stone backsplash looks fantastic!
Krista says
Wow! The colours in the stone really pulled that together! Very impressive!
Chelsea says
This looks great!
Kim says
Holy smokes, that looks absolutely fantastic. Lucky girl!
Kimberly @ The Brown Eyes Have It says
I LOVE IT! My kitchen is the same oak with gray countertops. That backsplash is perfect! My husband really likes it, too. Adding that to my wishlist.
Kristin says
I love it, it is gorgeous!
Michele in IL. says
Very nice!!
Ginger says
Love! I may be copying you soon! {Well, as soon as I convince the hubby!} Featuring YOU over on my blog today! Thank you so much for linking up to my {wow me} wednesday party last week. 🙂 Feel free to stop by & grab a featured button!
Ginger @ gingersnapcrafts.com
http://www.gingersnapcrafts.com/2011/11/take-look-at-you-my-favorites.html
Amber says
I just ran across your blog while browsing Just a Girl. My husband and I just put in the same backsplash in our kitchen and we love it! I love seeing how multifunctional it is – it can work in any kitchen! Thanks for sharing, very beautiful!
howtonestforless says
How cool! I just LOVE It!
Theresa says
Wow… we just purchased a box from Lowes last night and brought to home to mull it over and get used to the idea… We love it but were wondering how difficult it was to put the switch plates on over the stone and questioned whether or not it needed to be sealed? How is it to clean? Did you put on a sealer?
howtonestforless says
It was difficult to cut around the light switches, but definitely worth it in the long run! We havent sealed it yet, but have plans to the near future. Lowes suggested sealing it once a year. Also it’s very easy to clean…I’m in love with it!
melissa sharp says
What a fantastic face-lift!! The stone really does do a great job tying the two surfaces together. Great job!
Kayla says
I love the backsplash that you chose! We eventually will be doing this in our kitchen, and have been wanting something just like this! Pinning this for later, stopping by from Ginger Snap Crafts!!
Shelia says
Oh, your backsplash looks marvelous! You have a very nice kitchen.
Be a sweetie,
Shelia 😉
Andrea says
I like these tiles. They upgrade the look of your kitchen. We just tiled our back splash this weekend. I saw these tiles in Lowes and mentioned them to my hubby but we went with glass mosaics instead. I think these would look good on the fireplace though.
Kim says
That looks great! What’s the name of the product you used?
howtonestforless says
Here’s the link to their product page!
http://www.lowes.com/pd_354383-93840-20-626_0__?productId=3362742&Ntt=stone+backsplash&pl=1¤tURL=%2Fpl_Del%2BConca_0__s%3FNtt%3Dstone%2Bbacksplash&facetInfo=
Tanna says
Hi, Just curious what color you have on the wall?? Sorry if I missed it somewhere! thanks
howtonestforless says
I have a muted green on three of my kitchen wall and a cherry red on an accent wall. Sorry, I don’t have the exact colors! Painted them long before I started blogging 🙂
Ashley says
looks great. amazing what some back splash can do for a kitchen! I’m thinking about doing my own back splash so hopefully it ain’t too hard to do lol
JennieD says
I clicked onto this when I saw that it mentioned backsplash for kitchens ~ which is something I’m planning down the road. First of all, I’d like to say that your kitchen looks fantastic! 🙂 With or without the backsplash tile! I’m also in the same ‘boat’ as far as not being able to afford a “total” revamp of my kitchen, so am making changes that I can afford and also live with. Once all the kitchen improvements are done with, I’d also like to do some kind of “backsplash” treatment too. My neighbors, also own a mobile home, has been in the process of redoing their kitchen. They’ve used some kind of glass material for their backsplash and it looks awesome! He showed me the back of this tile, has a mesh netting, that makes it easy to cut & trim to fit where it needs to be installed. I’ve seen a “faux brick” backsplash at IKEA that I like, but haven’t exactly decided on what type of “backsplash” material to use. I’ll let you know when I get to that point in my kitchen “redo.” 🙂
howtonestforless says
I can’t wait to see it Jennie!! Definitely send me a photo 🙂
JennieD says
Thanks for replying to both of my comments ~ [Vintage Pendants & Stone Backsplash]. The backsplash of my kitchen “redo” will be the last step of my kitchen project. Later today, Tuesday, I’ll be working on one of the plywood boards that will go under the kitchen sink area. [I’m having to reconstruct the “floor” area of the cabinetry]. I hate it when people “mickey-mouse” things and they don’t know what they’re doing to begin with! 🙁 No worries, will definitely post some pics of the tiled backsplash when that phase of the kitchen “redo” is done! At least I’ve got 80% of the painting done in the kitchen! 🙂 Take care & have a great week! 🙂
Alan says
love it sooooo much
where did u get that backsplash i can’t fine it
howtonestforless says
I got ours from Lowe’s!
Cindyt says
My daughter and I were just talking about doing this in her kitchen yesterday! I reposted one of your pictures on my facebook page with credit and link back to you. Looks like a very do able project…and have encouraged my daughter to do it. She is kind of scared to tackle this project…as her husband doesn’t do projects around the house unless it has 4 wheels attatched to it…. 🙂 Do you think this would be a good Mother and Daughter project?
howtonestforless says
Thanks Cindy! I have to admit that I didn’t actually do this project on my own (my neighbor did most of the work), but I’ve heard WONDERFUL things about AirStone. Super easy to work with and you don’t need a wet saw to cut the stone. You can even get it at Lowe’s. Check it out here: http://airstone.com/
Hope that helps! Good luck to you!!
Todd says
How did you get the light switches to fit on the backsplash flush? I wanted to do the same thing but the installer asked that we put the slate in the living room instead because of the light switches/outlets. Please help
howtonestforless says
Working around the outlets was a little tricky. We definitely had to lay out the backsplash first to see what configuration would work best. We tried to get the thinnest pieces right around the outlets so it would be as close to flush as possible, but the outlets are not perfectly flush with the backsplash. There might be an 1/8 inch gap in some areas, but it’s definitely not noticeable unless you’re really looking for it. Hope that helps!
Jeff says
It definitely looks incredible. We are putting that in our kitchen right now. How did you get around there being gaps on the edge where you started? Lowes doesn’t make a border and trying to figure out how to fix that so there aren’t gaps showing has me stumped.
howtonestforless says
Yeah, the outlets were a little hard to work around. We basically dug through the boxes to find the thinnest pieces that we could put in that area. The switch covers still were not flush against the stone backsplash once it was up, but finding the thinner pieces for that area definitely helped it look better without major gaps. Just keep trying different configurations to find what works best! Definitely the most grueling part of the entire process.
I hope that helps a little bit! Let me know if you have any other questions!
Dave says
great job and look…is it a problem to clean esp. in range area?
howtonestforless says
It was not difficult to keep clean, just a quick wipe down after large messes. I would recommend sealing though every other year.
Erin S. says
Looks awesome ! Would anyone happen to know the color of her floor ?
howtonestforless says
It’s just a vinyl that looks like oak hardwood flooring!
Audrey says
My husband and I are considering this for our kitchen makeover (we have water damage). Our biggest concern is that it will be hard to clean. What is your experience with this?
howtonestforless says
It wasn’t too bad to keep clean. We sealed it every year and just washed it with light soap and water. And since it was groutless it was easy to clean as well.
Tammy says
Your kitchen looks great, I have two question…Did you tile behind the Refrigerator and how far down did you tile behind the Stove?
howtonestforless says
No, we did not tile behind the refrigerator. We stopped where the countertop/cabinets ended. Also, we only tiled behind the stove straight across from one top of the base cabinets/countertop to the other.
Jeff says
It looks great! I have a beautiful 70’s kitchen (lol) that I’d like to update without changing our cabinets — right now, anyway. This seems like an affordable way to make a huge difference. I’ll also change the counter top to a prefab formica top.
My question to you is this: How did they extend the electrical boxes out to be flush with the stone? Did they take the box off of the stud or did they just pull the outlets and switches out to make them flush (kind of how it looks)? Thanks!
Jeff says
Ah! Scratch my last question, I see they sell outlet spacers at Lowe’s:
http://www.lowes.com/pd_465902-53911-B1MGEXT-2___
Thanks!
– Jeff
Bridgid says
Looks great????????
Lara S says
Btw, I love your choice of stone. In my last house (the one with rough hewn beams) I had a slate and travertine floor in my kitchen, dining & hallway. The colors, tones and bits of metallic and iridescence were absolutely gorgeous and I miss it!
Sherri says
I love your stone and countertops together is your counter top flormica or granite.
howtonestforless says
They’re formica!
Sherri says
What formica was that. I am redoing my countertop and backsplash and I want to copy yours I have been looking forever for what I like to put together and I found it:)