I found this adorable fabric scrap wreath from One More Moore’s blog post she created back in November 2010. I thought this craft would be the perfect idea to add a little bling to my daughter’s bedroom door.
 So off I went to get my supplies! I purchased a metal wreath frame for $3, a bundle of fabric pre-cut scraps for $6 (I had a 50% off coupon) and white Scribble paint for $1 from JoAnn Fabrics. I also got a ceramic “E” for the center of the wreath for $1 from Hobby Lobby.
 I decided to use pre-cut fabric since I don’t have a huge stock pile of scraps hanging around. Plus I really liked the multi color packet I picked out!
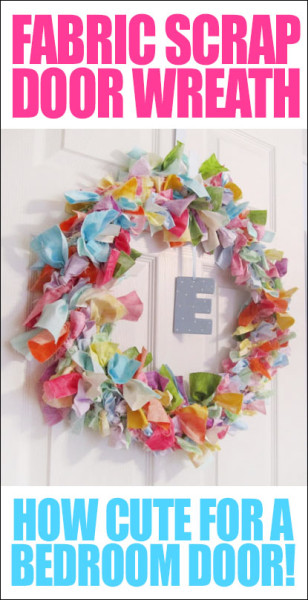
 I still cut the strips into 1/4 pieces so each strip was about 6 inches long. I then tied each piece around the metal wreath.
 Yes, it takes a long time to tie each piece of fabric around the wreath, but it will be worth it!
 Finally finished! Loving the look so far! Next is working on the centerpiece of the fabric wreath.
 I took the ceramic letter and painted it with Annie Sloan Chalk Paint in Louis Blue. I got this sample pot from Shades of Amber. Perfect for little projects and to try out shades before you buy an entire quart!
 When the paint dried, I used the white Scribbles paint to add some cute polka dots. I hung the letter from the middle of the fabric wreath with some light blue ribbon. And it’s complete!
 Pretty cute, huh? I love how all of the colors pop against the white door!

 Yep, pretty stinkin’ cute! The Louis Blue chalk paint is almost the exact shade of her walls! Love when things work out perfectly 🙂

Julie says
I love it and hope to make some soon…would make a GREAT gift as well!!!
Amber Holder says
That looks awesome! I LOVE the colors you chose 🙂
Kim@todayismysome-day says
Love the colors. Great idea buying the precut bundle. I don’t have a variety of fabric on hand either, so this is a great way to get it cheap (with coupon!). Stopping by from Debbie Doos party.
Red BrIck Shanty says
I love this wreath! It seem like it was easy to make and the color choices are endless. I can see a fall wreath in the makes as we speak:)
Megan Brooke says
Super cute idea! I agree, I love how the colors pop on the white door 🙂
Gina says
That is an adorble wreath! I love all the pretty colors. I would have never thought to buy a precut bundle…great idea.
OurGrowingGarden says
Wow! This is such a good idea! Following from Tip Junkie!
Mamarazzi says
oh how i love this. so simple and yet so divine!! thanks so much for sharing, i am going to book mark this!
followed you from Tip Junkie.
Sadie U. says
I love it! For sure going to have to try this!
Morgan says
Turned out adorable : ) xoxo
Debbie @ OtRD says
Too cute! It looks amazing in the bedroom!!
Love that pattered wall in the back too, is that stenciled?
howtonestforless says
Thanks! Yes, it is stenciled. Easy project!! I purchased it from Cutting Edge Stencils and used just everyday craft paint in silver. I posted about it here: https://howtonestforless.com/2011/05/02/damask-stencil-wall-for-daughters-bedroom/
DogsMom says
What a wonderful project that adds so much punch of color. I hope you are going to link it to the Nester’s Wreath party next week.
howtonestforless says
Wow, I just found The Nester’s Wreath party. THanks for the head’s up! I’ll be joining next week 🙂
Mimi says
Oh – I really LOVE this! It is so cheery and colorful. Thank you so much for sharing at The Inspiration Board 🙂
Katy Lunsford says
I love this. How many rings do you put the scraps on?
katy_lunsford at yahoo dot com
howtonestforless says
I only put it on two rings, the inner and outer. I filled in the spaces where needed after that, but it really didn’t need too much! Hope that helps 🙂
Audra says
Such a cute wreath! I’d love for you to link up at my link party! Hope to see you there!
http://www.thekurtzcorner.com/2011/08/tuesday-tutorials-link-party-no-4.html
Audra says
Just wanted to let you know I featured you on my FB Fan Page 🙂
https://www.facebook.com/pages/The-Kurtz-Corner/218297661553809
howtonestforless says
Thank you! Going to check it out now!!
Kimberlee says
I love precut bundles. it makes creating a coordinated craft that much faster. I may just do this for a christmas wreath with a jelly roll I have hanging around. Just need to get a wreath frame. Thanks for posting, it is the first time I have seen the wreath frame used, and I don’t remember seeing them before at the craft store. A definite must have. Visiting from Show and Tell Wednesday.
~ Kimberlee at The Spunky Diva
Mary @ Redo 101 says
Gorgeous, love it! I totally want to do this using fall colors for my mantle. Thanks for sharing the tutorial and beauty!
Hugs,
Mary
Jerri says
This turned out wonderful! I love the colors on the wall too!
I’d like to invite you to link up at my Friday Favorites party!
Sonya says
This turned out so cute. I have LOTS of scraps so this would be a great idea to try!
joann says
I love !
mum of all trades says
I love this!You have some fantatsic projects on your blog, I’d love for you to link some of them up to my blog link party this weekend, http://mumofalltrades.blogspot.com. Hope you can make it and thank you!
Melissa says
Love it! Did you do that whole room yourself? It’s all so beautiful! I’m a new follower from Homework’s blog hop. I would love if you linked up at my blog hop, today.
Sarah says
This is fantastic. I have seen similar with ribbon but I like this so much more. That’s a gorgeous room, too.
Stopping by from Just a Girl.
Candace Creations says
That is so sweet! love the wreath!
I would love it if you come link this up at Scrappy Saturdays @ candacecreations.blogspot.com
Chelsea-Love My Element says
I love it! The room is also darling! Is that wall stenciled or wall paper? I am a new follower.
howtonestforless says
Thanks! It’s a stencil from Cutting Edge. Super simple to do! You can find the entire blog post about it in my Project Gallery. Hope you’re having a great holiday weekend!!
Mandy says
These are so cute. This was actually my son’s class gift for parents when he was in kindergarten only they used a wire hanger and each child brought in one yard of holiday fabric – we hang it up every year!
Katy Lunsford says
I love this!
Do you tie the scraps on the top and bottom only?
Where did you get the scrap bundle? I have a JoAnn’s but haven’t seen anything like that.
katy_lunsford at yahoo.com
howtonestforless says
Yes, I only tied to the outer and inner circles. I purchased by fabric scrap bundle from JoAnns. I’m sure you can ask an associate for help finding them! Otherwise I made another one for Fall use fat quarters from WalMart. The bundle was $10 from there and was the perfect amount!
Christine Knight says
Great idea. I love the shabby chic of it but it is sophisticated as well. Gonna make one.
Natalie@OrganizedHabits says
Very nice! It looks like one of those in-front-of-the -TV crafts (I can’t watch TV without doing something with my hands). I’m going to try this one!
Irina says
I love this wreath…it is full of happiness!
Jerri says
Thanks for linking up for Friday Favorites. I just added this to my pinterest page! I hope you will link up again!
KayleighAnn says
This is beautiful! Can’t wait to give it a go, though I might use the technique on a headband. Found your link on somewhat simple thursday linky party and pinned it straight away. I love recycled crafts.
Livi says
Loved it! I’ll make one for my daughters’ bedroom too.
Brandy says
So cute!@
suburbancorrespondent says
Help! I pinned this wreath on Pinterest, but now I am realizing that I have no idea how wide the fabric strips should be. Can you tell me? We’re facing a rainy weekend and I would love to make a few of these with the girls.
howtonestforless says
I did 1.5 inches wide and about 4 inches long 😉
howtonestforless says
Sorry, 5 inches long!
Diana Duncan says
Love your wreath–I am going to make these with our Mom Time Ministry Group–was one bundle of fabric enough to do it all? Did you have to buy more?
howtonestforless says
One bundle was enough, but I cut each strip into 1.5 inch by 6 inch pieces!
Bethany says
LOVE THIS! Pinned it for further reference! I love scrap fabric everything…thanks for the great idea!
howtonestforless says
Thanks Bethany!!
Karen Barnhart says
I made this turned out great I used an 18 inch wreath, love it. going to make a 12 inchone.
howtonestforless says
Awesome Karen! They’re addicting, aren’t they? 😉