 I’m in the process of switching my kitchen over to a lighter color scheme. I had this little accent table sitting in there, mostly holding my tupperware and some serving pieces. Since I don’t have a lot of cabinets, I really wanted to keep this table… just switch it up a bit!
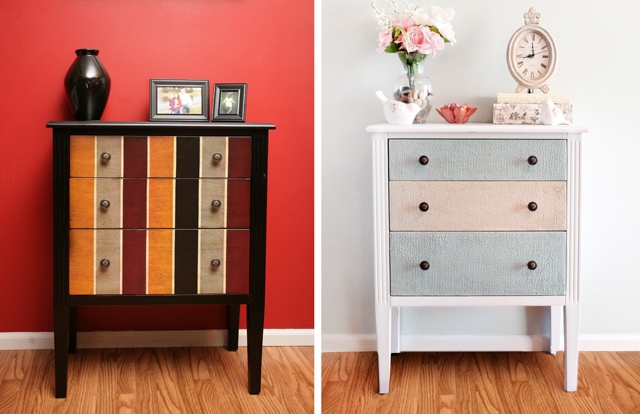 I started by painting the main part of the table white and the drawers in ASCP Duck Egg Blue, but it didn’t have enough pizzazz.
 And I’ve mentioned in the past that I purchase all of my Annie Sloan Chalk Paint supplies from a local store called Wood Icing, but did you know that Wood Icing is actually the name of a product they created? Yep! So I decided to give it a whirl.

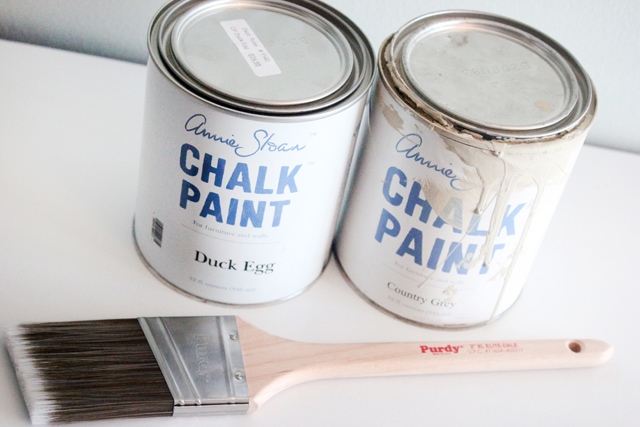
I gathered my supplies:
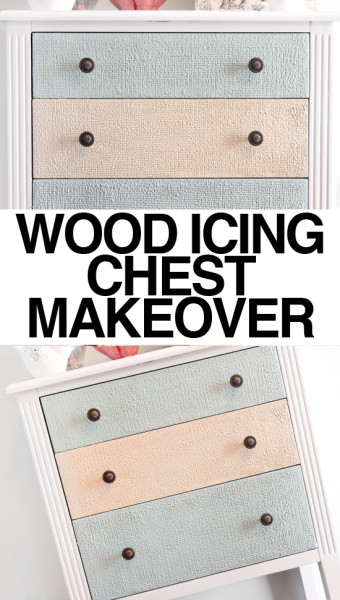
- Wood Icing textura paste
- Textured shelf liner
- Off set knife
- Spray bottle filled with water
- Plastic spreader
- Annie Sloan Chalk Paint (duck egg blue and country grey)
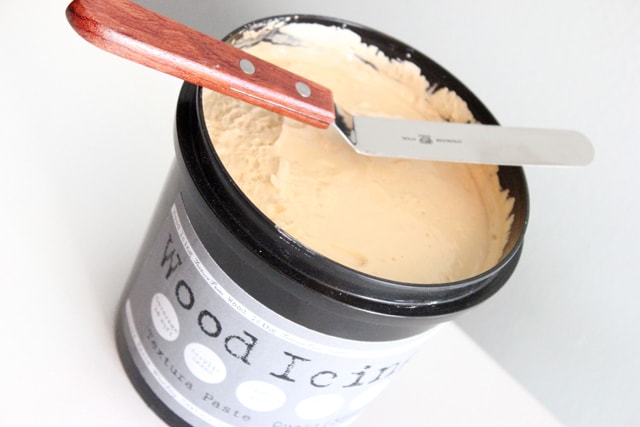 The Wood Icing textura paste is a faux finish that can transform your furniture, cabinets and more. You can create your design using stencils, lace, or anything with texture.
 To begin I spread the Wood Icing textura paste all over the table drawers using the off set knife (remove all your hardware first!). Don’t worry about the paste being perfectly smooth. Looks like peanut butter, doesn’t it?
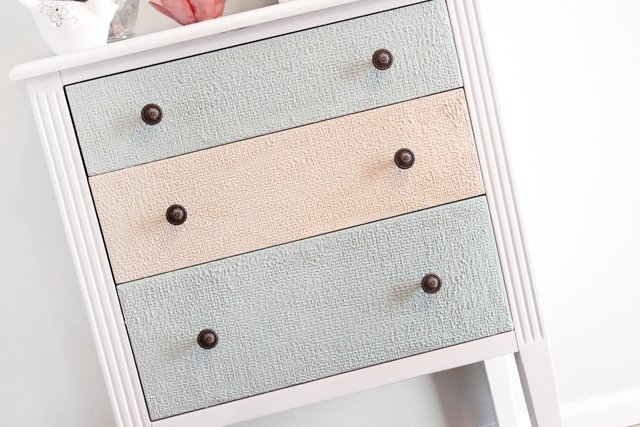
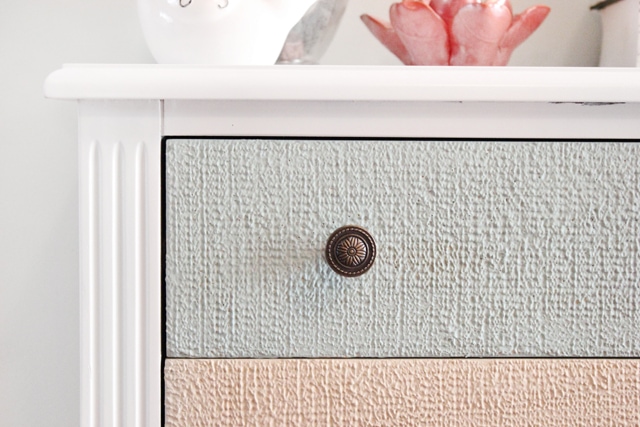
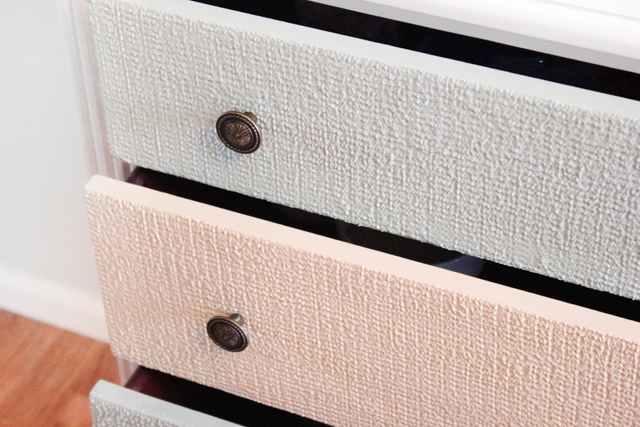
For the faux finish I wanted an allover texture. I spotted some shelf liner at Lowe’s and thought I’d give it a whirl. Yep, cheap & easy.
 Next I generously sprayed down my textured shelf liners with water and pressed it into the table drawer. Once I had it positioned, I ran over the backside of the shelf liner with my plastic spreader.
When I peeled up the shelf liner up it left this cool pattern!
 Do you notice there’s no holes for the knobs? To fix I pressed my screws through the back side of the drawer where the old holes were and the dried textura popped right out!
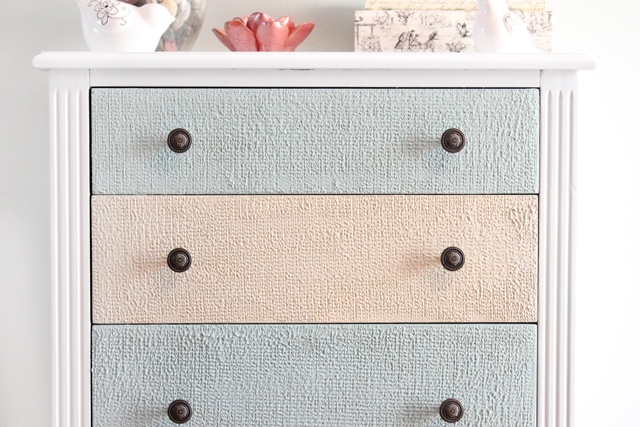
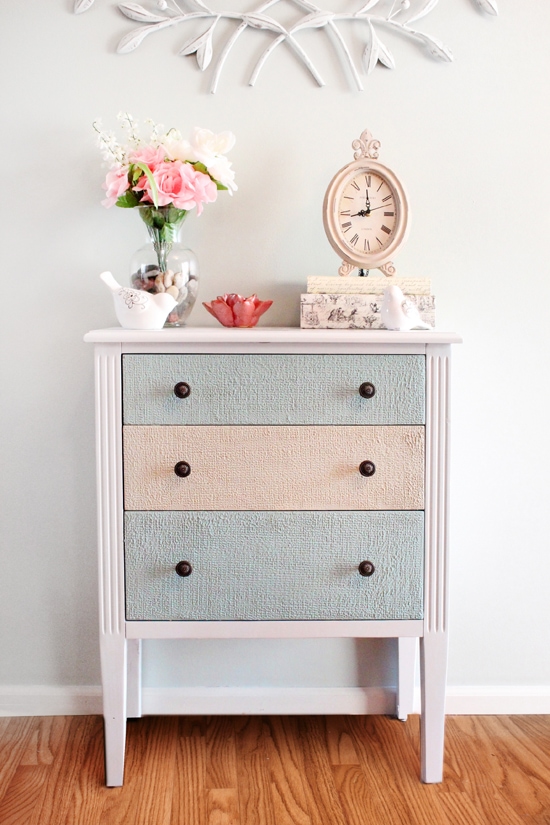
Now I was ready for some color! I painted the top and bottom drawers in Duck Egg Blue and the middle in the Country Grey (which is really more of a tan).
 I attached the original hardware and I’m done!
 So, what do you think?
 Here’s a bunch of photos!


 I’m haven’t waxed the piece yet. I’m trying to decided if I want to do some dark wax to bring out the texture even more, or just coat with some clear wax. I’ll let it sit for a bit and decide down the road.
 Yeah, I was a little nervous about painting over such a beautiful table before, but I’m really happy with the end result! And I can’t wait to use more Wood Icing™ in the future! Very cool faux finish. You can actually order it online by clicking here!

Jacque@theDIYvillage says
Wow this is awesome, the texture, the colors, LOVE it all. What an awesome product!!! Pining this to my Up-Cyclced furniture inspirations!
howtonestforless says
Thanks so much Jacque!
Gina says
Don’t use dark wax. I think a poly will be best to protect the texture
Michelle says
I love this! We’ll be changing the dresser/changing table in my son’s room and I was thinking about putting it in our dining space as a buffet. While the black would still match the furniture, giving it a little treatment would really spruce up the piece. Thanks for sharing!
howtonestforless says
You’re welcome Michelle. Good luck with your piece!!
Sunday Burquest says
Totally adorable! I’ve never heard of wood icing, so many cool possibilities! Love it!
howtonestforless says
Thanks Sunday! I’m totally lovin’ this product so far!
Mary C. Nasser says
Love that texture created by the shelf-liner!
What a transformation!!
howtonestforless says
THanks so much Mary!
Stacy says
Beautiful!
Monica says
About the texture I would like to say “Wow”
howtonestforless says
Haha!! Thanks Monica 😉
Beckie says
Oh my gosh Erin I love everything about this. I facebooked and pinned it. The colors are gorgeous and I think the texture is amazing. I have never heard of that product but that gives such a great effect!
howtonestforless says
Thank you so much Beckie!! Lovin’ this new stuff. Great product to hide the imperfections of old furniture!
Melissa says
Hello gorgeous! I love it!!!!!
howtonestforless says
Thanks Melissa!
Alyssa says
Wow, I had no idea something could do that to wood. It is super cool, and you did a great job! Love the new color scheme 🙂
I’d be absolutely tickled if you came by my “place” for a visit, http://www.myclevernest.com.
(the normal tickled, not the creepy kind.)
<3 Alyssa
Angela says
I LOVE it. My favorite part about it is the texture! Great job!
Jenn@myfabulesslife says
This is AWESOME!
Mar says
That looks so much better! I have such a bad habit of starting projects and not finishing them. I’m really loving the texture part of it.
Im a New follower from the networking blog hop. Swing by for a visit when you can!
Mar
http://www.RaisingBean.com
Heather says
What a wonderful transformation! I love the finish that the “icing” gave. It is wonderful!!! I’m going to have to get some to try….. Excited to be following you, now! Found you at Live. Laugh. Rowe’s weekend hop. Hope you can visit soon?! Have a great week!
howtonestforless says
THanks so much Heather! Can’t wait to check out your site!!
Revi says
It’s a great piece, and it looks lovely both ways! 🙂
-Revi
Rose Wilde says
I am very impressed with your first Wood Icing project Great job and I love the creativity with the shelf liner for the texture. I really like the choice of Chalk Paint(TM) colors. I vote for the clear wax. This looks so fresh and clean. Thanks for sharing!!
howtonestforless says
Thanks so much, Rose! I’m absolutely in love with the product. I can’t wait to start my next piece!
Heather Haymart says
Oh my gosh Erin, that is amazing! Especially for your first try. It is such a treat to see what other people think of to use for texture ideas with Wood Icing.Thank you for writing about our shop and Wood Icing. I agree with Rose (my mom) clear wax for sure.
howtonestforless says
Thanks Heather! You girls are the best. I really appreciate all your help and the great info on new products!
Mary Beth Shaw says
I love your clever use of the Wood Icing – creating texture with a shelf liner, genius!! Those Annie Sloan paints rock. I did a child size chair in the Duck Egg (using Wood Icing Fissure which causes the cracking, oh YUM). Anyway, I chose the dark wax because I wanted more of a vintage look. It is really lovely, not too dark at all, subtle in a way that brings out depth without overwhelming it. You can’t go wrong with either color of wax, I think it mainly depends on the context of your room.
howtonestforless says
Thanks Mary Beth! I can’t wait to try the fissure next time 😉
Peggy says
That is absolutely gorgeous! I have never heard of wood icing before, but I love it! I love the texture and the depth it gave your piece. I also love the colors you chose for it!…pretty jealous of it!
-peggy
howtonestforless says
Haha! Thanks Peggy!!
amy@maison decor says
The drawers look like they are covered in a nubby linen fabric now~its pretty remarkable stuff!
howtonestforless says
Thanks Amy! I’m in love!
Vicki says
Looks fantastic, how clever! Never heard of wood icing but it looks awesome!
howtonestforless says
Thanks Vicki! Lovin’ the stuff so far!
Amanda says
I love this! I love the texture it gives. I am going to have to find this!
howtonestforless says
Thanks Amanda! You can get it online from Wood Icing’s website. You’ll love it!
Peggy-PJH Designs says
I love that stuff! Must try it on something soon! TFS. Won’t you stop by and share at Totally Transformed Tuesday. I know my readers would love to see. Hope to see you there. Peggy
howtonestforless says
Thanks so much Peggy!
cassie says
what a cool and unique look! thanks for sharing!
Judy says
I love the new look. The texture is amazing and I think the color combo is perfect. Thanks for sharing at DIYbyDesign.
howtonestforless says
THanks Judy!
Kathryn Griffin says
I have never see that texture before! Fantastic job! I love it! Thanks for sharing. Visiting from Beyond the Picket Fence. Would love it if you would share this at my Make it Pretty Monday party at The Dedicated House. http://thededicatedhouse.blogspot.com/2012/07/make-it-pretty-monday-week-7.html Hope to see you at the bash! Wishing you a grand week. Toodles, Kathryn @TheDedicatedHouse
Ashley says
Your table looks amazing! I’m intrigued, I’m going to have to look into that wood icing stuff…so.many.possibilities. I am curious as to how it would hold up to toddler abuse though…if the icing would chip of crack. Update us if it does!
howtonestforless says
Thanks Ashley! I have a 4 year old and it’s held up quite nicely this past month thus far! I’ll definitely keep you updated 🙂
Kelly says
Turned out pretty awe to the some!! Love the texture 🙂 Thanks for linking up to LLR! Hugs!
howtonestforless says
Thanks Kelly!
Britni says
WOOOOOOOW!!! I have never seen anything like this, or heard of wood icing. It’s gorgeous! The color and the texture are just WOW! You did an amazing job. I would love if you shared this at my Throwback Thursday link party. http://www.hubbymademe.com/throwback-thursday-no-3/
Thanks so much for sharing. Definitely have to pin this and will be following along with you!
Sarah says
I’m in love with that texture! It makes so a huge statement.
If you get a chance I would love for you to link up your tutorial at my Pin Party on Monday.
http://www.sarahdawndesigns.blogspot.com
Anne says
fabulous idea! love the different colours too. new follower here!
howtonestforless says
Thanks so much Anne!
Stephanie says
Terrific project – looks like it was done by a orofessional. The texture is awesome.
howtonestforless says
Thanks so much Stephanie!
Nicole@Show Off Friday says
I love that gorgeous texture and those colors!
howtonestforless says
Thanks Nicole 🙂
debbie says
I need this! I have a dresser with drawer problems! It looks great and I love the colors!
howtonestforless says
Thanks so much Debbie! Hope you’re doing well 🙂
Miss Kitty says
Very cool! I saw your post as it was featured by Carolyn from her “Be Inspired” party…congrats!
howtonestforless says
Thanks Miss Kitty! Such an honor 🙂
Sarah@20 State says
Ohhhh wood icing sounds like heaps of fun…I wonder if you could add it to a canvas for texture…mm brain whirling into gear.
howtonestforless says
Ooh Sarah, that’s an awesome idea!! If you try it, let me know how it turns out!
Katie says
Gorgeous job Erin! I’ve never heard of wood icing… i’m definitely intrigued to want to try some! Love the light color combo!
howtonestforless says
Thanks Katie! LOVE the stuff!!
[email protected] says
Featuring YOU today! Thank you for linking up to {wow me} wednesday.
Ginger @ gingersnapcrafts.com
http://www.gingersnapcrafts.com/2012/08/take-look-at-you-my-favorites.html
howtonestforless says
WOW, thanks so much Ginger! Headed over now to check it out!
Betsy says
I love this textured look. I’ve never seen this.
I am LOVD says
One word: WOW!
Casey says
This is such a great idea!
Tara Cashion says
I am so glad I saw this post on Centsational Girl’s blog. I love the textured look and can’t wait to try the wood icing.
howtonestforless says
You’ll love it Tara!
Terri says
Wow, never heard of “Wood Icing”, but it is definitely something I will be checking out. It would be great for covering up “blemishes” on wood…the possibilities are endless. I am sure I am not the first to “pin” this, but I hope it is okay!
howtonestforless says
You’ll love Wood Icing, Terri. Yep, perfect for hiding blemishes. Can’t wait to start my next project with it. And please, pin away!!
Dana {CraftedNiche} says
very cool! I really need to get down to Wood Icing. Ugh.. just tough with my work schedule!
howtonestforless says
I know what you mean! I always stop by there during my lunch hour 🙂
Kim says
That is fabulous!!
howtonestforless says
Thank you Kim!
Suezi Gurzi says
I just found your blog through Stories from A to Z and I love what you did to your table!! It’s fantastic!! Has the texture on the front of your cabinet held up? I would love to know if you have had an chipping?? Itching to find something to try this on! Love it!
howtonestforless says
Hi Suezi. Yes, the finished has held up perfectly! No chips at all that I’ve noticed (although the texture does hide imperfections quite well). I would highly recommend! I’m going to be starting another project with Wood Icing soon. I’ve been itching to try it again!
carolynshomework says
Hi Erin,
I absolutely love your project and wanted to let you know I featured it on my new site Details. A sister site to Homework, Details will spotlight beautiful projects that have the little “details” that make them extremely special. I’d love for you to stop by and take a look. http://carolynsdetails.blogspot.com/
Carolyn
homework
& details
Darlene says
This turned out beautifully!! Thanks for sharing!
howtonestforless says
THanks so much Darlene!
Alix says
What a unique piece! What colour is the top and legs?
howtonestforless says
Thank you! The top and legs are just a white semi gloss paint. I believe I used Valspar.