A couple of weeks ago while checking out Rosy Red Buttons blog I found a clock that was created using family photographs…brilliant!
 While I loved the idea of this project, I thought I could create it much easier using a clock I found on clearance. So I got to work!
Pretty cute huh? This quick & easy project is a great gift idea, plus easy on your wallet. Gotta love that! So, here’s how I created this personalized family photograph clock…
 I found this clock on Christmas clearance at Gordman’s for $4. Score! This would be a perfect base for my project.
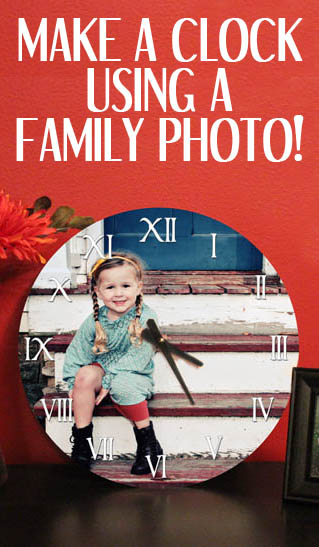
![]() I found the photograph I wanted to use from our recent family photo session. I opened that sucker in Photoshop and got to work. I cropped it into a circle using Photoshop about 1/2 inch wider than the actual clock measured (I figured some bleed room would help when assembling!).
I found the photograph I wanted to use from our recent family photo session. I opened that sucker in Photoshop and got to work. I cropped it into a circle using Photoshop about 1/2 inch wider than the actual clock measured (I figured some bleed room would help when assembling!).
Once I had the photo cropped to the size it was time to add the numbers. I decided to use Roman Numerals…a little different but that’s just me!
 I printed it out on sticky vinyl so I wouldn’t have to worry about choosing a glue or using Mod Podge.
I removed the clock hands and peeled the backing off the sticker paper. I positioned the sticker into place and pressed down firmly so there were no bubbles.
 Once everything was in place, I trimmed off the excess paper.
 I reattached the clock hands and that’s it!
Yep, that easy. Once I had the paper printed, it was only about a 15 minute project! LOVE that!!


Kari says
First off this looks so fantastic! I may have to make one for MIL’s birthday coming up. And secondly you have the cutest little girl!
Kari
howtonestforless says
Aww, thanks so much Kari!
Terri says
I am not sure which is cuter the clock or picture or your daughter, adorable!! This is such a cute idea, now I will be on the hunt for a clock to use! Found you on the Haven link up, look forward to meeting you in June.
Terri aka http://www.craftyworkinmommy.com
howtonestforless says
Aww, thanks so much Terri! I’m excited to meet you in Haven!!
kellie says
AWESOME job! Thanks so much for sharing 🙂
Karah @ thespacebetweenblog says
Oh my…I can’t tell you how much Iove this! So great, what a beautiful way to display a meaningful pic. 🙂 Thanks for sharing!
Karah @ thespacebetweenblog
howtonestforless says
Thanks so much Karah!!
Lama says
Wow! that looks so easy to do. I love this kind of projects! 🙂 Since I don’t have a vinyl printer, which glue would work best with this project?
P.S. Thanks for your thoughtful comment on my etched window design. 🙂
howtonestforless says
THanks Lama! You could print out photographs on normal laser paper and adhere it with Mod Podge!!
Marie says
oh my gosh this is beautiful!!!! i’m totally going to be on the lookout for clearance clocks. 🙂 we’d love for you to link this up at our Sunday Best Party. http://griffithsrated.blogspot.com/2012/02/sunday-best-22612.html
-marie
Mandy says
What a great clock!! I’d love it if you shared it at a party that I have going on at Project Queen.
http://www.projectqueen.org
Jill says
Love the clock! I would love for you to link it up at my party going on now! (it’s my first one!)
Jill
Www. Jillifyit.com
howtonestforless says
Congrats Jill! On my way over now 🙂
mary says
Great photo for this project. If you have time, I’d love to have you stop by and link up!
Mary @ Very Merry Vintage Style
Megan says
This is so adorable! What a really cute idea. (Stopping over from the Kurtz Corner Link Up).
howtonestforless says
Thanks so much Megan!
Danielle @ReDesigns by D says
This is an awesome idea. My mum would love it! Have to see if it will work with modgepodge…
howtonestforless says
I’m sure it will! And it would be a great gift 🙂
Jan @SouthernJunkin' says
Cute, Cute!! The photo you chose is perfect!
howtonestforless says
Awww, thanks so much Jan!
Kimberly says
This would make an awesome gift! Love!!!
howtonestforless says
Thanks Kimberly!
Vanessa says
That is beyond adorable and so clever! My kiddos would love this and I’m thinking I might have to do this in their playroom. Thanks for sharing this creative idea with us at Inspiration Friday!
Vanessa
howtonestforless says
Thanks Vanessa! Hope you guys are doing well in this crazy weather 🙂
Rachel @ Lines Across says
Beautiful as always! The picture fits perfectly with the clock. Thanks for sharing. You are being featured this week at Lines Across. http://linesacrossmyface.blogspot.com/2012/03/cure-for-common-monday-30.html
howtonestforless says
THank you so much for the feature, Rachel!
April says
I LOVE this!! I may have to try and make one of these soon with the photos from our upcoming photo shoot!! Can’t wait!!
theoliverlife.blogspot.com
howtonestforless says
You have to share it with us April! I wanna see 🙂
Tera Leigh says
Where can you buy printable vinyl? Adorable project!
howtonestforless says
You can get it printed at Kinko’s! Or you can just use a large piece of label paper. I would paint the old clock white first so the old design doesn’t show through.
Lori @ coloritsimple says
I love it!! How creative…nice job thanks for sharing your inspiration! I am your new follower…..would love to have you follow me back
howtonestforless says
Following you back, Lori! Thanks for stopping by.
Beth says
I’m so glad you linked this to the PInterest Challenge party! I too copied the Rosy Red Buttons tutorial but while I love my square clocks (I’ve now made four of them!), I was trying to work up the courage to try a round one. Thanks to your blog I now have the courage to try!
howtonestforless says
THanks Beth!! Ooh, a square clock… that sounds awesome! I’ll have to try that one next 🙂
Erin @ The Great Indoors says
This is really precious– way to go, and thanks for linking up with the Winter Pinterest Challenge!
Erin
Erin @ The Great Indoors says
P.S. Great name . 🙂
howtonestforless says
Thanks Erin (and love your name, too!).
William says
Great post!
Where can you print on vinyl?
And any tips for getting clock hands off and back on without destroying your clock guts?
Thanks in advance 🙂
howtonestforless says
You can buy vinyl printer sheets to go through your computer printer or have Kinko’s print it out for you. Remove the clock hands before you apply the sticker paper, then lightly prick your holes for the hands through the paper with a pen or exacto knife. Hope that helps!
Alicia Holman says
Do you have the steps to do this in Photoshop? Thank you! A friend of mine lost her son and I wanted to try making this for her.