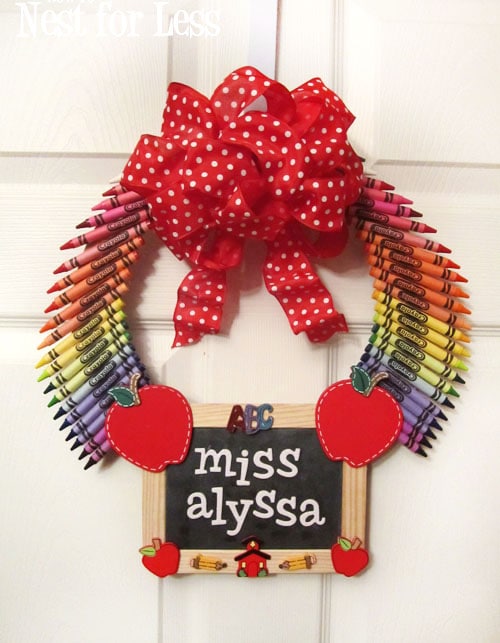
As you might recall, my little 3 year old started pre-school last week (see her first day here). She’s going three days a week at a neighbor’s house and loving every minute of it! I thought I would do something special for her home classroom and kept seeing some neat school wreaths on Pinterest. LOVE that idea!
Cute huh? Here’s how I made the personalized teacher classroom wreath!
 I first gathered my supplies:
- 12 inch floral craft ring
- 2 boxes of crayons
- mini chalkboard
- 2 craft wood apples
- smaller craft wood decals
- ribbon
- hot glue gun
- Thickers stickers
 First thing I did was practice laying out my crayons to get the right feel of the wreath. I only used 2 boxes in my wreath instead of the 3 I originally purchased. I decided to use the crayons in a spectrum from red to purple and discarded the other colors.
 Once I knew my placement, I used my hot glue gun to attach the mini chalkboard.
 Next I started to glue the crayons around the craft ring. I started with purple closest to the chalkboard and worked my way up to the top with red.
 Here are all of the crayons glued. I left the space empty at the top since I knew I was going to place a large red and white polka dot bow there.
 For the empty spaces near the purple crayons and chalkboard, I used the large craft wood apples and glued them into place.
 I used the smaller craft wooden pieces such as pencils and a schoolhouse to decorate the rest of the chalkboard.
 I purchased a large red and white polka dot wire ribbon from Michael’s with a 40% off coupon for the top of the wreath (originally $7).
 Last thing to do was place the glittery white Thicker stickers from Michael’s on the mini chalkboard to spell out my daughter’s school teacher’s name.
 And that’s it! Pretty simple and cheap project (entire thing was under $15). Plus what a great personalized gift for a teacher’s classroom door!


Megan says
WOW, very cute!!!
Irma says
Ahh! I love it, soo cute. Great idea.
Jenny says
That is very cute! She will love it!
Nikki says
SO SO CUTE!! This is great!! Would love it if you would stop by and share this at my linky party 🙂 http://everything-underthemoon.blogspot.com/2011/10/bedazzle-me-monday-4.html
angie says
so super cute love your wreath come see me at http://shopannies.blogspot.com
Mandy @ Sugar Bee Crafts says
Thanks for linking to Take-A-Look Tuesday – you were featured today!
–Mandy, http://www.SugarBeeCrafts.com
Peggy Banks says
Love it! Please post this, and anything else you may have,in my link party at
http://diycraftstomake.blogspot.com/
Thanks,
Peggy
Gabby says
That is way too cute (and very thoughtful). I’m always looking for teacher gift ideas, since my daughter just started Kindergarten. Thanks for sharing this! You did a fantastic job!
Gabby
The…Late, Young Family
Stephanie says
That is really cute! It makes an excellent gift!
Heidi Saunders says
I am just wondering where you bought your mini chalkboard, wood apples and craft ring for this. I am want to make this but can’t figure out where to buy it. I live in a small town and wondered if I needed to go to the city to buy some of it.
howtonestforless says
I bought the mini chalkboard and little wood pieces from Michael’s!
Tina says
This is so cute. Where did you get the craft ring from?
howtonestforless says
I got the craft ring from Michaels!
Melanie says
I made these for my daughter’s preschool teachers. Had a little trouble with arranging the crayons evenly all the way around, but I’m happy with how they turned out. Thanks for the inspiration! http://www.bearrabbitbear.com/2012/08/crayon-teacher-wreaths-back-to-school.html
howtonestforless says
You’re welcome Melanie! Glad to hear they turned out ok 🙂
Judith Soltess says
I am loving all that you do! Thank you! Hugs to you!
howtonestforless says
Aww, thanks so much Judith!
Priscilla says
Adorable… but am I the only one who feels this is wasteful? I teach at a very low income school and my kids always end up going without — pens, pencils, crayons, markers, theme paper, folders, you name it, we (teachers) buy it. While I love the thought of making something like this (or a pencil wreath), I would feel wrong in doing so. I suspect my kids would rather I just buy a pack of crayons for them to use!
howtonestforless says
The box of crayons for the wreath was 25¢ at Walmart at the beginning of the school year, and we donated 30 boxes to the local charitable foundation for an entire classroom at a local low income school! Best $7.50 I ever spent 😉
Marie P. Angoco says
I really love this idea! I would like to do this for all my fellow teacher friends as an end of the year gift.
Is there a way to preserve the crayons so critters don’t nibble at it or to keep crayons from breaking due to moving wreath or wear and tear? Thank u!
howtonestforless says
Unfortunately I haven’t thought of one except for to store it in bubble wrap!