So a couple of weeks ago my brother and sister-in-law asked if I could help transform their bedroom furniture. As newlyweds often do, they each brought a couple of pieces from their old bedroom sets into their new life together. My task: to paint the dresser, mirror and one nightstand black to match their other nightstand and TV stand.
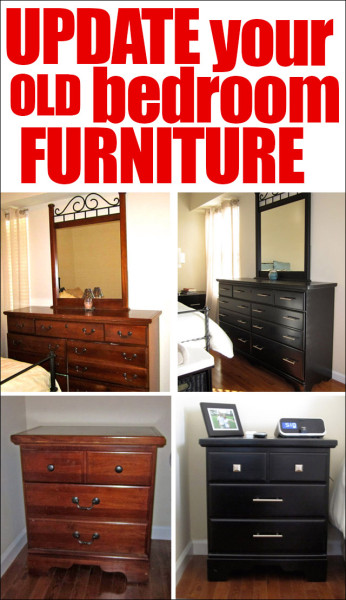
Here are the before shots…

 Please pardon my crappy photos. I had very little natural light in this bedroom and didn’t want to create hot spots with a flash.
And here’s the AFTER photos!
 Here’s how I completed the transformation:
We carried the furniture downstairs from their second story condominium and out into their garage. The first step was to wipe all the dust off and remove the hardware. My sister-in-law decided not to keep the current hardware, but still use the existing holes so I didn’t have to fill them with putty.
 I sanded down all of the drawers and the base of the nightstand and dresser.
 Once the sanding was complete, I used Rustoleum’s flat black spray paint to cover the drawers. To make sure I didn’t get any paint inside the, I just held up a piece of cardboard against the edges while I spray painted.

For the base of nightstand and dresser, I used Valspar’s flat black latex paint along with a small roller brush for the tops and sides and a smaller hand brush to get the detailing. And here’s the painted nightstand!
 OK, onto the large dresser! Now we couldn’t move this piece downstairs to paint cause it’s just too heavy… so, I had to set up shop in their dining room! I used the same flat black Valspar latex paint to coat the base of the dresser. Once the paint was dry, I used Minwax polyurethane to seal the dresser and nightstand.
 The dresser also had a matching mirror that I had to paint. I taped up the inside with painter’s blue tape to protect the mirror.
 OK, ready for some after shots?
 Here’s the before & after side by side! Isn’t it amazing how paint and some new hardware can change a piece of furniture from traditional to modern?
 And here’s some shots of the dresser…

 See the black nightstand in the left of the photo? Yep, that’s the black nightstand they already owned! My sister-in-law matched the new hardware perfectly!
Here’s the before & after of the dresser side by side…
 They still need to get their walls painted and some wall hangings, but a HUGE improvement thus far!
 Total costs: $9 for the Valspar flat black paint, $8 for the Rustoleum black spray paint, $10 for polyurethane, and a couple bucks for drop cloths, sandpaper blocks, paint trays, brushes, rollers, etc. I would estimate the total costs being around $50 without the new hardware. Not too shabby for a completely transformed bedroom set!

Denise says
This turned out fantastic!
Black was a great choice to compliment what was already there!
Erin of HomeSavvyAtoZ.com says
Great face lift! The furniture looks so different that it must feel like a whole new room! Well done!
I would love for you to link up your post at my Savvy HomeMade blog party at http://www.homesavvyatoz.com/2011/08/07/bog-party-2
I found you at the newbie party and am a new follower!
Judy says
What an awesome transformation. Looks so much more modern and cool. I am your latest follower. I found you via Debbie’s party. I hope you stop by and say hi. Also, I host a link party that opens each Tuesday night at 8pm EST. Would love for you to join in the fun.
howtonestforless says
Wonderful! I’ll link up this week. Also, I’ll add you to my Link Party page 🙂
howtonestforless says
Thank you!! I just linked up to your blog. I also added you to my Link Parties page! Thanks for hosting.
the cape on the corner says
that’s a perfect match, and love those knobs. what a great transformation!
Rondell says
I love it especially the hardware, doesn’t evenlook like the same furniture! Great job on it!
cassie says
wow! what a difference!!!! they look so modern- the hardware looks fabulous!
kimberly @ craftyland says
That’s fantastic! I’ve been eyeing our bedroom furniture for a while now.. it is in desperate need of a makeover too. Love how a coat or two of paint can make such a huge difference!
Kimberly
Beverly says
Wooza! That is great. Over from NTT. I know they are tickled pink.
Bunny Jean says
I think that furniture looks so much better painted black. I also used black spray paint to refinish a few of my pieces of furniture.
I host a party on Wednesdays that is a showcase for bloggers with less than 500 followers…. and I would like to invite you! (the linky is open now)
xoxo BunnyJean @ BunnyJean’s Decor and More!
http://www.BunnyJeansDecorAndMore.blogspot.com
I am # 141 in the Met Monday party.
debbie says
That is pretty darn fantastic. You would nEVER know that was the same furniture.
Christine says
Wow! Fabulous job! They must love you for that…Christine
Savannah Granny says
This was a great transformation. It is amazing what a little paint can do. The new hardware was just the right touch. Thanks for sharing.
I am a new follower hopping over from Bunny Hop Wednesday. Please come visit me and enter my neat giveaway. Ginger
Suzie says
THis looks great! What a transformation!
I’m your newest follower! 🙂
Suzy says
What a great transformation. I love how you were able to match all the furniture and modernize it. I would love to have you join my link party that will be up this evening.
Whycuzican says
Not too shabby is the understatement of the year….AWESOME transformation!! Bravo!
Visiting from Bunny Jean’s Linky Party (Bunny Hop)
~Suzanne in IL
Korrie@RedHenHome says
WOW! Such a great illustration of how hardware can change a piece. Beautiful work!
PJ says
What a stunning transformation! Love the square knobs too!
Crystal & Co says
Get out of here! I am beyond envious of people who can transform furniture like that!
Totally sharing on Facebook. Thanks for linking up! 🙂
howtonestforless says
Thank you for the lovely feature! I appreciate it!! Love your blog 🙂
Meg says
Wow! Paint is a wonderful thing. Great job!
Bunny Jean says
I came by to say thanks for joing the Bunny Hop party this week, and make sure that I am following you.
Thanks for putting my Bunny on your sidebar 🙂
xoxo Bunny Jean @ BunnyJean’s Decor and More!
http://www.BunnyJeansDecorAndMore.blogspot.com
Katie @ On the Banks of Squaw Creek says
oh wow! I’m totally loving the new hardware!
Cynthia at Shabby Friends says
WOW. Love the black. Love the hardware.
Carmie of the Single Nester says
You did an outrageous job!
Chris says
Wow! It looks amazing! You did an awesome job on the paint, and you picked out the perfect hardware for it! Thanks for sharing!
Red Brick Shanty says
I love your re-do. I re-did and chest odf drawers and painted it black too! I think black instantly updates anything!
SJ @ Homemaker On A Dime says
Hi, friend! You’ve got so much creativity and I’m admiring them all. Can you please share your creative posts at the Creative Bloggers’ Party & Hop? Hope to see you there at the party 🙂
Emily says
Nice work! Your transformation is impressive! I’m sure that your brother & sister-in-law will be using your services for more projects down the road.
Best,
Emily from Nap Time Is My Time
debbie says
Hey!!! I love it !!!
I have a similar situation and I hope I can do this as beautifully as you did it. My only concern is there’s no way I can move the big dresser downstairs also my king size bed, so how do i sand it in the room itself. Any trick I can use to re-do the bedroom set without having to move it?
Thanks!
howtonestforless says
I sanded my brother’s dresser right there! Just put down some old sheets or a drop cloth first to help. Yes, you’ll have to do some vacuuming or mopping, but the end result is totally worth it! Hope that helps, Debbie 🙂
Vicki Barber says
Any special technique for spray painting. I know it is harder than it seems it would be.
howtonestforless says
I only spray painted the drawers and used a normal small roller brush for the larger areas. Just make sure you’re keeping at least 6 inches between the furniture and the can so you don’t get runny paint drip marks. Hope that helps! It really is easy 😉
Amy says
Awesome redo! Is there a particular reason why you used spray paint on the drawers and regular paint on everything else though? Thanks!
Wendie Waldman says
I’m so impressed with this transformation. You’re a genius!
Lily says
What sheen poly did you use? Also flat, like the paint?
howtonestforless says
I used a satin poly and flat sheen paint. I find it best to work with flat paint since it doesn’t leave streaks. The poly in a satin is much easier to work with!
Irene0587 says
Wich kind of minwax polyurethane did you used for it..? Satin or semigloss..?
howtonestforless says
Satin.
gini says
Thanks for all the tips here… I have some nice oak furniture from the 80’s that I would love to update. Now that its 3 years later, I’m curious as to how the finish held up. Were there any problems with peeling or scratching?
howtonestforless says
Furniture has held up wonderfully! Even through two moves.
Larkin says
Question…why did you use spray paint only on the nightstand table?
howtonestforless says
Super smooth finish with no brush strokes!
nunu says
Omg this how I want my furniture for my bedroom
Annette says
Wondering why u used the Rustoleum on the drawers in the beginning. And why it wasn’t mentioned on other pieces. Beautiful.
Thanks 🙂
howtonestforless says
I wanted super smooth coverage for the drawers with no chance for brush strokes (although looking back now I could have used Floetrol or something similar to condition the paint). So really no need to spray paint, it was just a personal preference at the time!
Michele says
Wow, amazing job. Now maybe this post will convince my hubby that we can do that with our furniture! He always tells me “no” when it comes to painting furniture.
Joy says
Did you need to prep the furniture first? I have a really dated set I want to update and I was thinking of using chalk paint but not sure yet. I am super lazy and I have about 6 pieces to do… It’s daunting.