My daughter is a budding artist so I really thought she’d love a space to create and color of her own. While I was at Goodwill a couple of weeks ago, I found a great desk for $30 that was in pretty good shape. When I called my hubby to see if he could pick it up, he mentioned that his mother had an old desk in the basement from when he was a kiddo that we could have… for free!

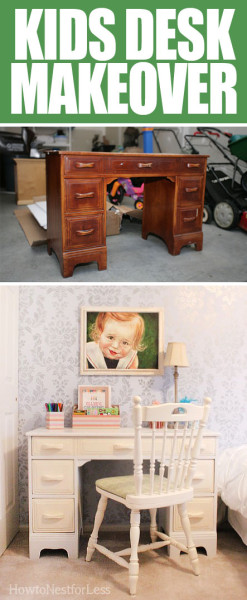
I nervously passed on the desk from Goodwill to see if I could turn my mother-in-law’s trash into treasure. Luckily, when I saw the desk in the back of her basement covered in toys and books, it was worth the wait! While it had some scratches and dents, overall it was a steal.
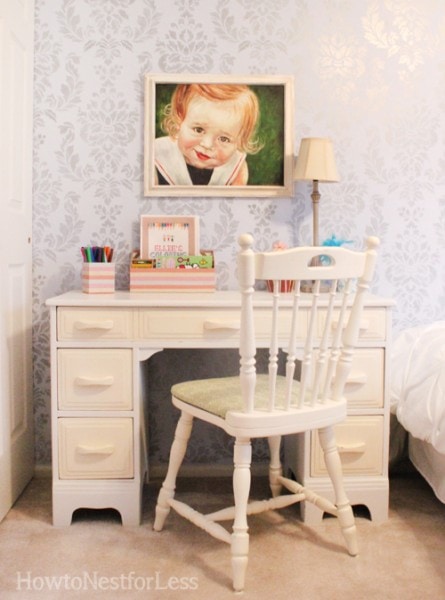
So here’s the before… and after! Here’s how I completed the transformation:
The first thing I did after getting the old desk home was give it a complete cleaning. The bottom was covered in cobwebs and the drawers were a little dirty. I washed everything with some light soap and water. Then I sanded the entire desk down.
The top had a large ball of puddy stuck to the top which I had to use the power sander to fix. For the drawers and crevices, I just used some light grade sandpaper. Once I was finished giving the desk a light sanding, I wiped down the table again to make sure it was clear of any leftover dust and grime.

To prime the table, I used Zinsser cover stain with the brown label. I used a roller to cover the large areas of the desk, a brush to get into the crevices and the spray paint version to cover the drawers with a smooth finish. I decided to prime the desk with two coats since I knew it would get a lot of wear and tear, sanding the desk lightly between each coat.

Once it was fully cured, I sanded the desk down once more and wiped off all debris. Now, this desk is going in a play room for now, but eventually I hope on having this playroom turn into a nursery and move this desk into my daughter’s bedroom. So, in order to do this, I had to make sure the color scheme would fit in both rooms.
For the actual top coat, I decided to use Rustoleum white semi gloss spray paint on the base of the desk. For the drawers, I used an offsetting color of spray paint, Sweet Cream by Krylon. I wanted the drawers to pop a little bit off the rest of the desk, and I thought the Sweet Cream color would go perfectly with my daughter’s bedroom set once it’s moved.
To finish the project off, I coated the desk in Minwax polyurethane spray paint in semi gloss. This will really protect my paint job and give it some durability.

Total cost of this project: $23 for the can of Zinsser cover stain paint (with plenty of leftover for future projects!), $7 for two cans of Rustoleum white spray paint, $7 for Minwax polyurethane and $12 for rollers and paint trays. The rest of the supplies I already had in my paint closet, mostly just drop clothes and sandpaper. So, the total was $49 (yeah, remember I got the desk for free!). LOVE IT.
For the desk accessories, I found the pencil holder and organizer from WalMart for $10. I wrapped a green and brown striped ribbon around the pencil holder to bring out the colors of the room. I filled the accessories with my daughter’s favorite art supplies.

I will probably line the drawers in the future with some cool scrapbook paper and of course I need a chair, but until then it’s perfect!


Cece says
I really like the combination of the two colors of white.. lovely and I am sure it will be a transformation enjoyed by your daughter for a very long time!
KORRIE@REDHENHOME says
Love the two-color look! Beautiful!
Cassie says
i love the very soft tonal look of it! a very nice contrast! it looks o fresh and clean!!! thanks for sharing!
sarah h says
wow, i love it. the subtle difference in color is a very smart choice – what an interesting piece and you’ve highlighted the best parts!
Courtney says
I love the little difference in colors- your desk came out so charming. Stopping by from ATPF today 🙂
Vanessa says
That looks just beautiful! I love the two tones in color and what a great place for your budding artist to let her creativity run wild! 🙂 Thanks so much for sharing this with us at Inspiration Friday~
Vanessa
Megan says
Turned out great and looks really good in the room!
Check me out when you get a chance! I love new followers!
Lisa says
Looks great! Fabulous makeover! And it’s so fun to have something passed down through the generations!
Meg says
I love it! The yellow is a great contrast and definitely adds some fun to the desk. I love what you did with this free piece!
Renee says
Awesome job…..what a difference your 2 tone paint job made! It turned out beautiful!!